AEC 531 A Regal Mark III bus

Melbourne / Victoria Transport Discussion

Moderator: MAN 16.242

Boff
Posts: 24
Joined: Thu May 26, 2011 1:27 pm
Favourite Vehicle: MCI MC7 and early Denning's
Location: Gippsland, Victoria.

Re: AEC 531 A Regal Mark III bus

Post by Boff »

AEC 531 wrote:Hi Tony,

I do not remember the AEC's in service at all, although by their destination scrolls they seemed to have operated in and around places that I would have visited when I was working, but I just have no memory of them. A couple of the other members that are working on the bus remember them.

The bus that operates in the Puffing Billy Thomas Days is a bobtail AEC Regal Mark III No. 592, it is the same as 560 only a bobtail, 560 still has its two doors and will seat 41 people.

It is interesting when the younger generation view the rail motor when we have it out, to see the funny looks we get. We had it open to the public at Ouyen one time, and a grandmother and her granddaughter came on board, the grandmother tells the granddaughter that these were the trains that took them to the city. They would stand on the platform and first hear the distant whistle then over the horizon came the headlight and finally like a familiar old friend it pulled up in the platform to take them on. We here these experiences often and we hope this will happen with the bus once it is going again.

Once the bus is finished the guys working on it will move on to become the drivers and operators of it under DERMPAV's management system.

Regards
Colin Kelly
Secretary
DERMPAV

The AEC's I drove where well on their last legs and the One I drove was painted up as a huge Fosters can for Sinclairs Bus lines 630 Route, Not sure where it ended up but the Depot Manager was keen on it. (Old pics below)

What a great reward for those who put blood, sweat and knuckle skin into the restoration, Also ensures she will be very well treated when in service!

And I can understand the reactions to the Rail Motors, Just seeing them in Video on your Youtube page makes me wistful lol

Image
Boff
Posts: 24
Joined: Thu May 26, 2011 1:27 pm
Favourite Vehicle: MCI MC7 and early Denning's
Location: Gippsland, Victoria.

Re: AEC 531 A Regal Mark III bus

Post by Boff »

AEC bus left rear of Pic BTW

And Below some of the mix from when small Bus companies existed

Image
User avatar
AEC 531
Posts: 39
Joined: Sun Feb 26, 2012 5:25 am
Favourite Vehicle: AEC Regal mark III bus
Location: Newport

Re: AEC 531 A Regal Mark III bus

Post by AEC 531 »

Hi All,

Before I launch into the annual report I have some very exciting news that I would like to share with you all. DERMPAV has created a Patreon Channel.

The DERMPAV Patreon Channel will allow you the opportunity to receive regular and much more detailed reports on the restoration progress of AEC 560. These video reports are posted to our Patreon channel soon after they are made. So you do not have to wait until the end of the year for a report on the progress being made on 560, you will have it nearly instantly.

Joining the DERMPAV Patreon channel will require a small financial contribution of $15.00 per month, this becomes $180.00 over the year. So here is the chance to shout yourself an early Christmas present. We have been loading content onto our Patreon Channel since October 2018. In our “On the Buses” segments which deals with the restoration of AEC 560 we are up to No.10.

After becoming a DERMPAV patron by making the financial pledge through our Patreon channel. You will have all the video content unlocked, as well as having the ability to contact us through our Patreon channel for our “Closing the loop” segment where we read out feedback from our patrons. You will also receive an exclusive invitation to our Depot Day, and this will only be extended to our patrons. This invitation will give you the opportunity to meet, greet and speak to those people that create the restorations that you watch from your home computer or device. It will also allow you the opportunity to inspect close up the restoration that holds your interest to be able to touch and feel it, to appreciate the investment of work.

Please consider joining us on Patreon as your financial contribution will be used to sustain our organisation into the future ensuring we can continue our restorations at a faster pace than we could previously. We do apologise for some of the video quality as we are on an enormous learning curve with lighting and camera angles to bring the best and most interesting content to you

Just below is a link to our Patreon Channel please check this out for a better description or to watch the introduction Video. Please view it, then scroll down to see the video content that we have already posted. If you then consider this worthwhile please push the orange button to become a Patron. Many thanks for your kind considerations. Join us on Patreon!

DERMPAV Patreon Channel – https://www.patreon.com/user?u=14209441

I think we should now move onto the annual report, where to start there has been so much progress!

As the festive season approaches once more, it has been my practice at this time of the year to reflect back on the year past and give you all an overview of the works undertaken on AEC 560. So I am back again to report on more progress in the restoration of AEC 560.

2017 had been a frustrating year for us as a number of distractions had taken our focus away from the bus. Problems were also experienced with the various curves in the framework that had to be accommodated in the rear frame repairs, to ensure the interior and exterior panels would rehang correctly. Although it looked straight forward the framework on the rear of the bus was very tricky to get it set correctly. At the end of 2017 we still needed to complete a couple of repairs, these were accomplished by late January 2018, then the rear frame repairs were completed and ready for inspection and sign off.

Whilst arranging the inspection to the rear frame work of the bus we were notified by our accredited Vic Roads Engineer that their company had moved in a different direction and could no longer continue with our project. They suggested another company and representatives for that company inspected the rear frame repairs of AEC 560, this inspection occurred on the 5th March 2018. The rear frame repairs were passed, but at the same time they completed a chassis inspection, this subsequently failed, where it had passed previously.

Our new engineer was concerned with the hump in the chassis where it rises up and over the rear axle. The Associated Equipment Company had installed a strengthening piece that sits inside the chassis rail and follows it over the hump of the rear axle. It did not look like it was sealed and concerns arose from the road grime and decay that looked like it is present within the gaps of the chassis strengthening piece and the chassis rail itself. Our engineer requested that the chassis strengthening section be removed and the surfaces between the two be reinspected once separated and cleaned. This resulted is us having to disconnect the rear suspension unit from the chassis, loosen the body to chassis securing bolts and clamps, then remove all the permanent fastenings holding the chassis strengthening member to the chassis rail and remove the chassis rail stretchers. Then the chassis strengthening members could be removed.

When we were told this had to happen we understood this was going to be a huge undertaking. Our accredited VicRoads engineer pulled no punches, indicating to us that if the chassis rail was decayed beyond acceptable limits the entire chassis rail would need to be replaced. We knew that was beyond our capacity to complete, so we then understood that if the chassis rail failed then we would probably scrap AEC 560. To say we were concerned was an understatement.

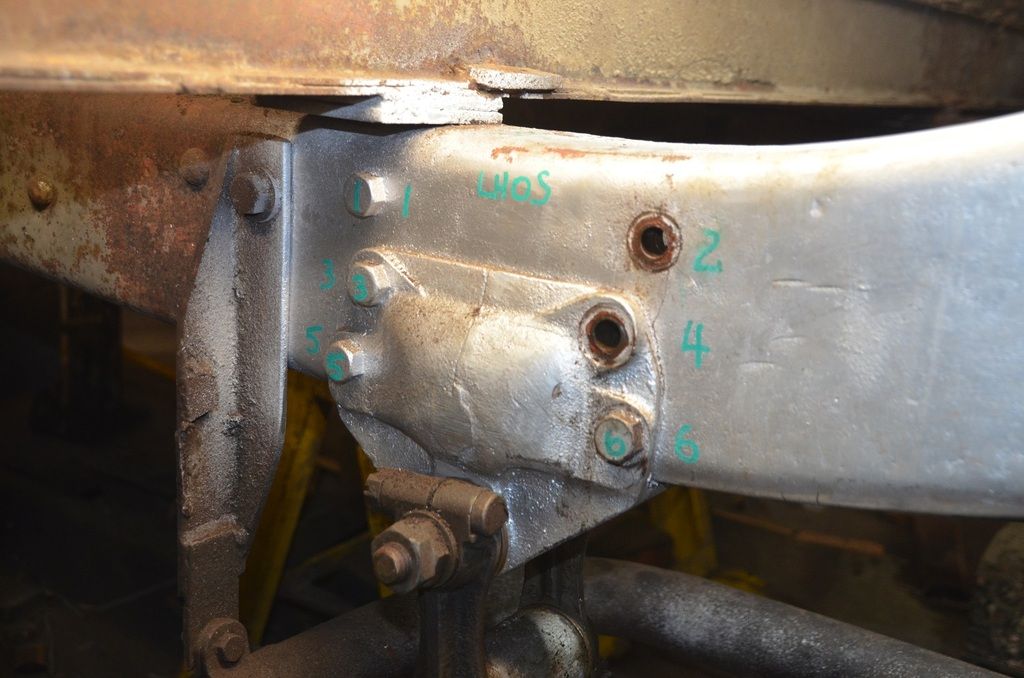
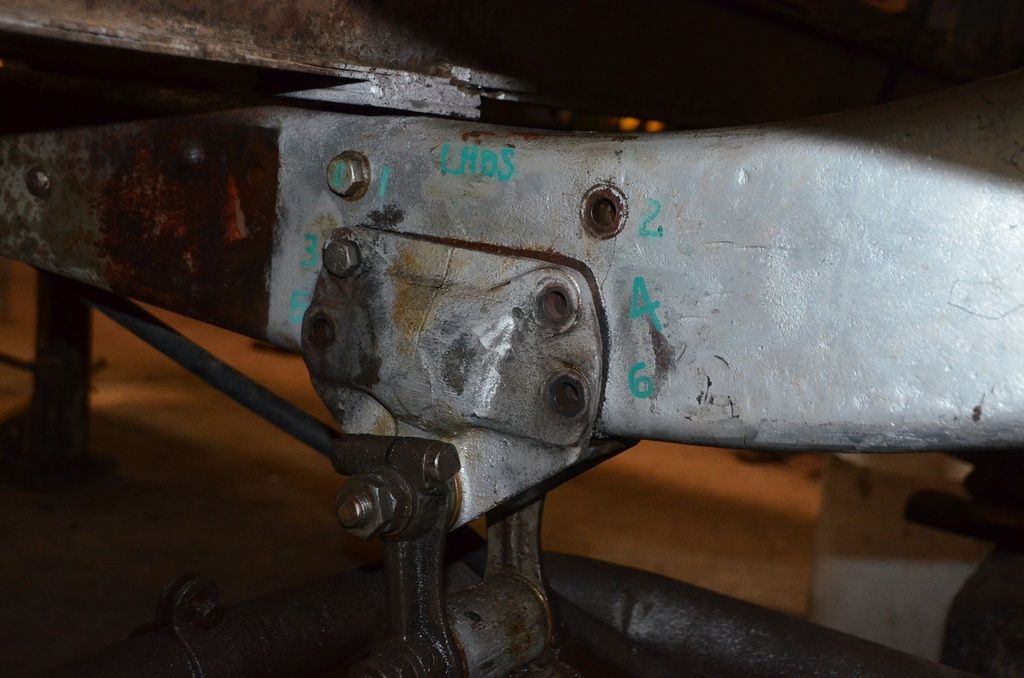
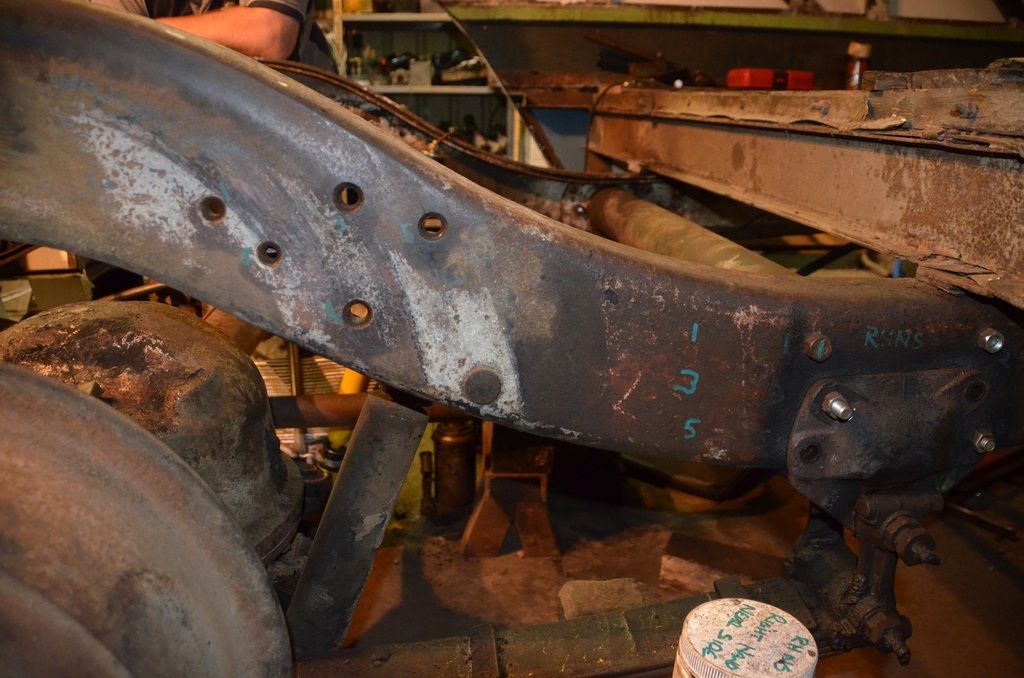
To give us freer access to complete this task we removed three floor sections in their entirety, these are, those directly behind, directly over and directly forward of the rear suspension unit, this allows access to the main work area to remove the chassis strengthening sections. Adaptors that fit the top of the jacks and fit the chassis rail have been constructed to prevent the chassis slipping when in use. The rear suspension unit has been securely packed to ensure it will not slip once it is released from the chassis rails. With a paint pen we marked the head of each of the bolts and marked the same number on the chassis section, this will enable each bolt to be replaced back into its original position, when we reassemble the chassis strengthening sections after the repairs have been completed. The removal of these bolts proved so difficult that it has required the manufacture of special kit, this allows our porta power the ability to force the bolt out of the chassis location. The problem with the bolts is they are fitted bolts placed into reamed holes in the chassis. These bolts were installed without the application of an anti-seize grease, hence over time they have rusted in place requiring superhuman strength to free them up. Carrying out our visual self-risk assessment we felt that we were going to do ourselves an extreme muscle injury if we proceeded, so we came up with the porta power option and stopped until the attachments were completed. At the working day of DERMPAV on the 18.9.2018 John Dixon worked tirelessly to remove all the nuts off the various bolts so these were ready to push out, and coated them with liberal amounts of CRC penetrant oil.

This restoration game is a hard and difficult task and one which constantly requires constant vigilance to identify hazards that are ready to spring out and ambush us. We very often stop work to give us time to sit and talk about the processes we are going to employ before moving forward. On the 13.11.2018 we successfully removed the off and near side chassis strengthening members. It was encouraging to see that the most of the decay caused, seemed to be confined to the chassis strengthening members on both sides. The rust that we struggled with between the laminations was off the chassis strengthening members, once these were removed an examination of the main chassis rail could be completed and both looked to be in surprisingly good condition. There was evidence of decay on the chassis but on the whole it looked like it was in good condition. The chassis strengthening members on the other hand are going to require extensive repair. We proceeded with the aid of a needle gun to remove all decay off the chassis rail bringing the pieces back to bare metal ready for inspection.

On the 27.11.2018 our Vic Roads Engineer came on site to inspect the chassis rail and the chassis strengthening members, this is better covered in On the Buses – 2018 – No.9. We discussed the condition of the chassis strengthening members and then how these could be repaired and obtained a scope of works for their repair. The chassis rail was then inspected and both of these passed inspection. That was a huge relief, I will tell you! At that point we knew the AEC 560 will return! We discuss the repair methods and the processes we will employ in some detail in On the Buses – 2018 – No.10. to make the chassis strengthening members serviceable again and preserve the chassis rail for future use.

When we reassemble the chassis strengthening members back into the chassis rail we are intending to apply a very liberal coat of Loctite 767 anti-seize grease we will then use a sika product to seal the joint gaps where the two joints meet. We feel this will allow us to remove these chassis strengthening members if the need arises again. The loctite anti seize grease will also provide a good barrier to resist the ingress of water or contaminates in the future. We are currently working on the repairs to the chassis strengthening members based on the scope of works provided, to again make them serviceable, as this is occurring they will be fitted back to the chassis rail to ensure they are fitted correctly.

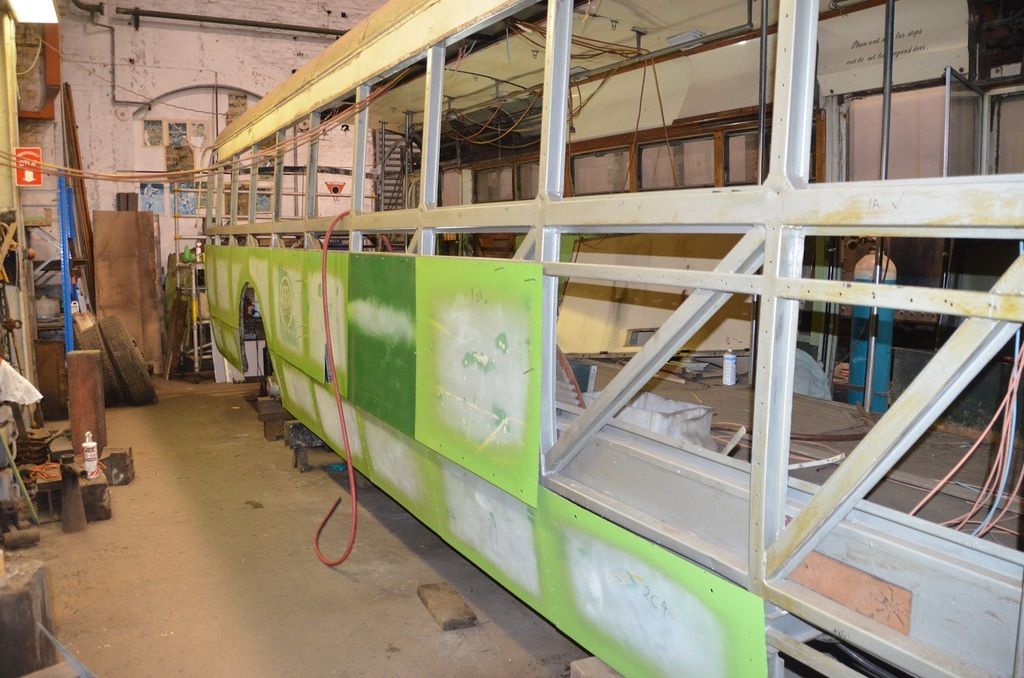
With the rear frame repairs passed, the bus restoration team then moved up a gear and painted the rear frame work of the bus, once this was completed they commenced refitting all the exterior panels on the off side, these had previously been repaired by our panel master. These were numbered to show their correct location on the exterior of the bus. They were first installed using our clecos or our small bolts and nuts to ensure the panels lined up with each other correctly and with the framework. Once this was established the fastener and each panel was removed and the edges of all the off-side panels were painted green to ensure there was enamel paint in the locations where two panels overlapped once the paint dried they were replaced back onto the bus. After this, the panels were fitted, being located with as many pop rivets as we could possibly fit into the panel to ensure it was correctly aligned. We were mindful that panels need to overlap each other and where this occurred we did not place rivets until the second panel was in place. Once we were happy with the location all the pop rivets were installed. We were also sealing with paintable silicon the position where the two panels overlapped, this will seal the joint and give us the best protection against rain water running in between the panels.

We had an extreme amount of trouble locating a solid aluminium rivet of the dimensions that we had taken out of the bus, these secure the roof panels and the gutter of the bus to the framework and the exterior panels. The head of the metric rivet was too small and there was not an imperial rivet available within Australia that met the dimensions required. I had a conversation with a chap from major solid rivet company in Sydney about sourcing these and he asked if I was restoring a Land Rover! No! I explained what we were doing, he suggested that we contact a firm in England that still makes all of these rivets and will supply in the quantities that we needed, he supplied the contact details. Looking on their website we found the rivet we needed it met all the head specifications perfectly and its shank was 7/32 which also seemed correct. It is a bit difficult to estimate the shank size from the original rivet as the rivet deforms during the installation process to occupy the available space in the hole. After we established the length of the rivet and the number required we wrote to the company asking for a price on these rivets. We also needed to acquire the air rivet gun and the respective rivet dolly for installation of these rivets. Again, none of this equipment was available in Australia so we thought that we would have to purchase more equipment, but in the end one of our members produced an air chisel and suggested that we manufacture a rivet tool to suit this gun. Another member who was is a retired fitter and turner made the mandrel on our lathe this fitted the chisel gun and effectively converted it into a rivet gun, he also made the rivet dolly. So, we did not have to purchase anything……Happy Days!

We have now replaced all the off side lower exterior panels of the bus and replaced the side dress strips and the advertising strips, we still need to paint and install the repaired window sills. Once completed we will then be able to identify the dress strips and then install these in position. The panel master advises that he will probably give the entire off side of the bus a coat of its correct colour green, as he feels this will lift the spirits of the people working on the bus. In any case it will need to have more coats of green added before we reach the final top coat.

The installation of the interior panels will have to wait until the chassis repairs are completed. On the exterior we will move across the back of the bus and down the near side. But first, we are going to work on completing and installing the off-side window sills, if you look back in previous posts you will see these have been out and the decay removed and sandblasted and undercoated. These will now receive our rust preventative paint then a hi fill primer with a tie coat and once applied they will then be painted in the bus green and once the paint is dry they can be installed into the bus. We also have one panel situated above the window sills that has decay, this will need repair it is held in place by the solid aluminium rivets, our panel master is working through the thought process on the best way to repair this panel.

Once we have completed the chassis repairs and the exterior panel repairs are completed to the off side, we will remove the exterior panels from the near side and start the frame restoration on that side, having seen the rear of the near side frame work it looks just like the off side with the addition of the door motors and the side steps. We still feel sure that 560 will still hold some challenges for us.

There is still quite a lot to do, the passing of the chassis inspection by our accredited Vic Roads engineer, has provided us with the necessary inspiration to forge on ahead. We only need to get down the near side around the front and we have finished. Easier said than done.

Paint
We needed to obtain the correct shade of paint to paint the exterior of the bus. We had no clue what that looked like, from a photo that had been sent to me I went to the paint shop and had it paint matched. I definitely do not recommend this process. I gave the paint to the panel master then about two days later received a phone call, the colour is wrong! Ok, so we journeyed over to the Bylands tram museum with our paint samples, after polishing a section of panel we matched the paint colour on AEC 537. We understood that a lot of research had been undertaken when this colour was applied to this bus. As that is the same era that we want to display AEC 560 in, we obtained a colour match off that bus. I then took it to our paint people and had it matched to the colour sample obtained off AEC 537. This was then used to spray the panels, no more phone calls!!. Our thanks is extended to the Bylands Tram museum for allowing us access and the ability to obtain an accurate paint match, your efforts are most appreciated.

At the start of 2018, the restoration team members decided that I should stand in front of my camera and make a video of the restoration progress of the bus and post it as a side juncture to this post. This is without a doubt a lot of work, and I am not sure I have done it justice! I think now that we have launched our Patreon channel where updates can be viewed as the restoration is created. I will revert back to this report as our annual report and using my still photos to illustrate the text. As I have previously stated, it is a huge amount of work, editing, rendering and posting videos for viewing. So, my apology there.

Here is a link to the Bus Australia Forum Video on AEC 560, please click on the link to run the video, hope you like it! https://youtu.be/JJaIyxlylNE

Once again, if you are interested in keeping up with the restoration progress on AEC 560. I would ask that you consider joining us on Patreon as stated above, your financial contribution will be used to sustain our organisation into the future and ensure the financial stability to ensure we can continue our restorations at a faster pace than we could previously.

If you would like to become involved with DERMPAV as an active member and be involved with the restoration of AEC 560 then please let us know you are interested, we can be contacted at info@dermpav.net.au we will then drop you a line letting you know our working days of DERMPAV so you can come along.
Image
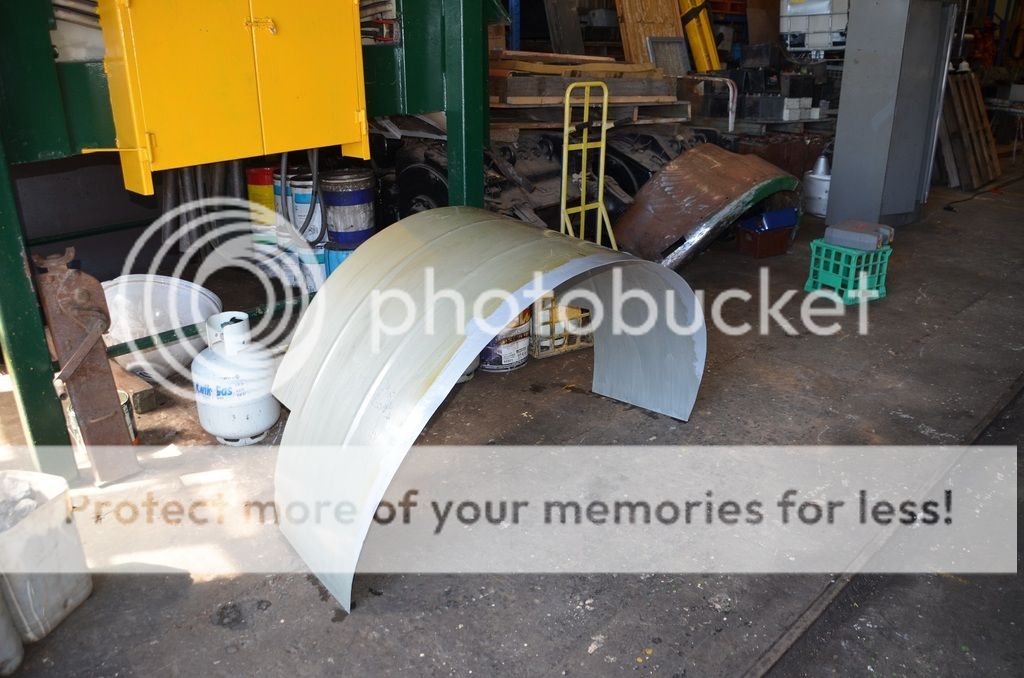
Above: The off side guard has had extra metal added and this has been prepared and painted, it is now ready for assembly.
Image
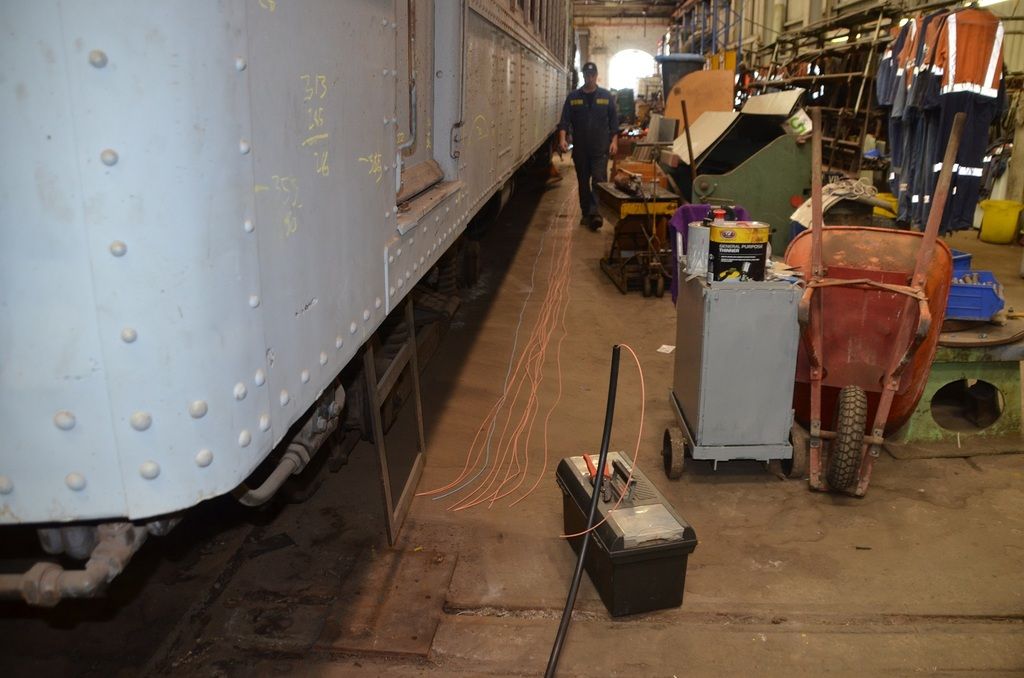
Above: Shows the electrical wires laid out next to 64 RM as the indicator, stop light tail light loom is made up, the wires are being readied to be combed as they are pulled into their protective sheath.
Image
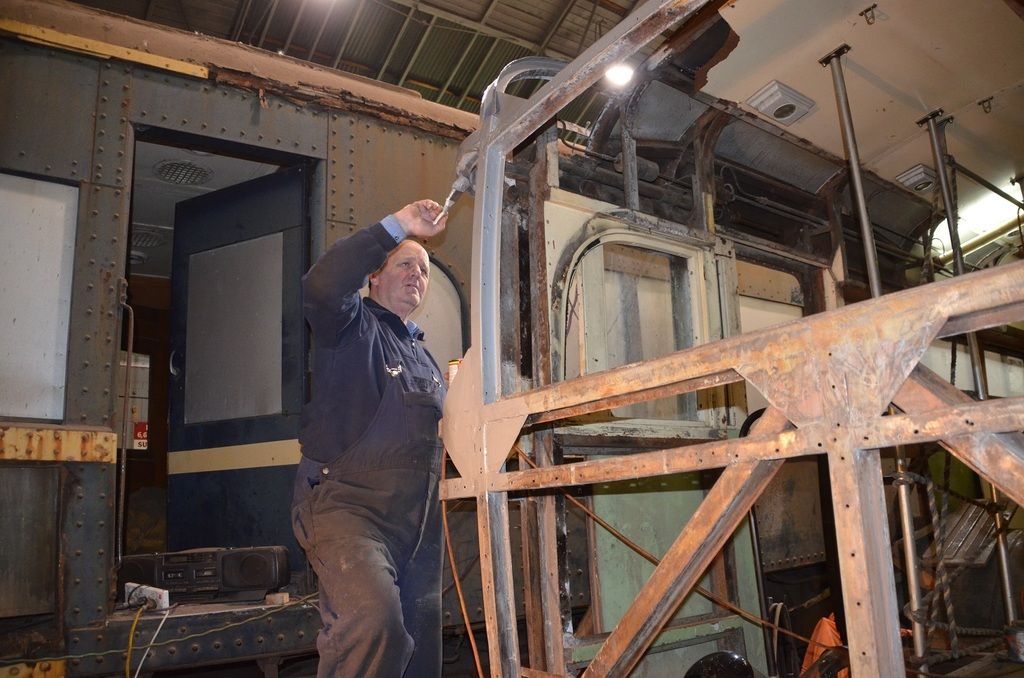
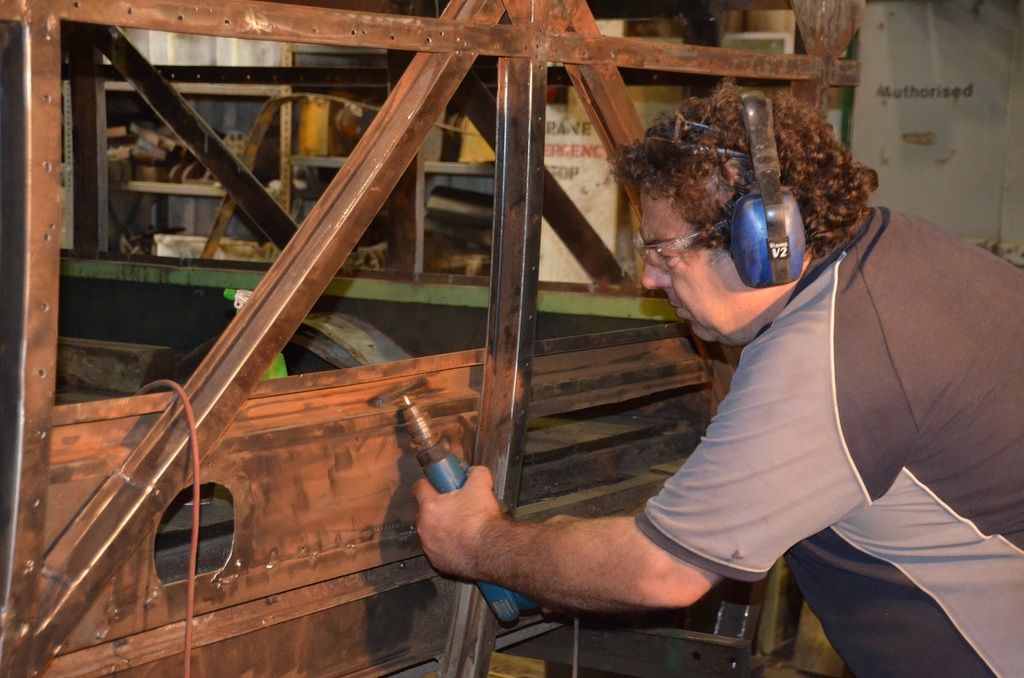
Above: Shows John using the wire wheel to clean off the surface rust for the rear frame inspection.
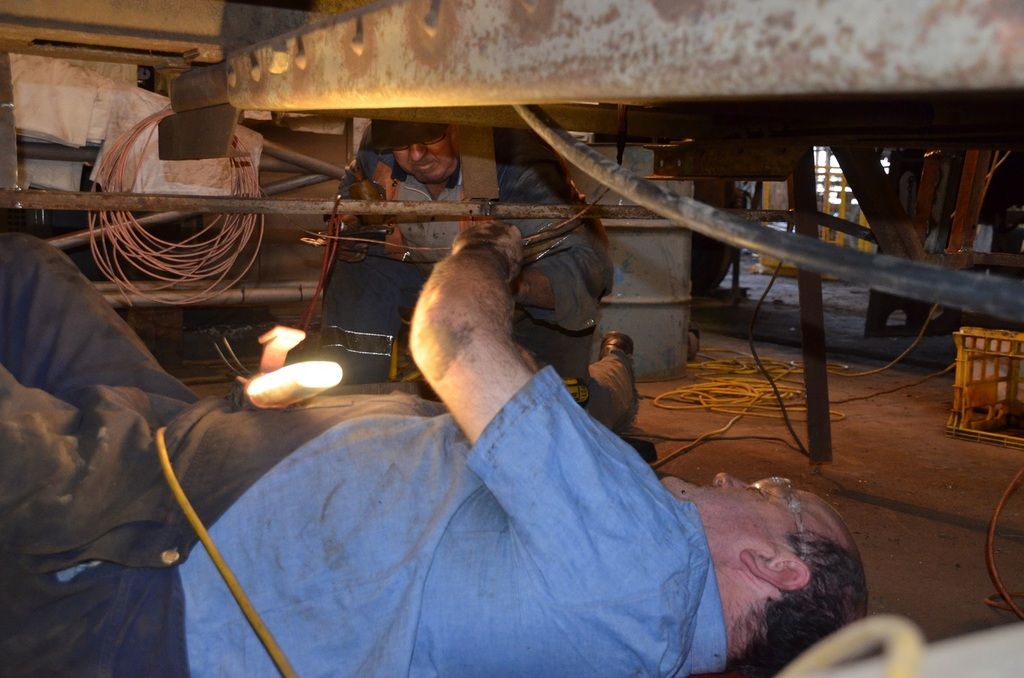
Image
Above: Shows Max and myself running the new wiring loom, this unfortunately was completed before we found out about the chassis strengthening member having to be removed.
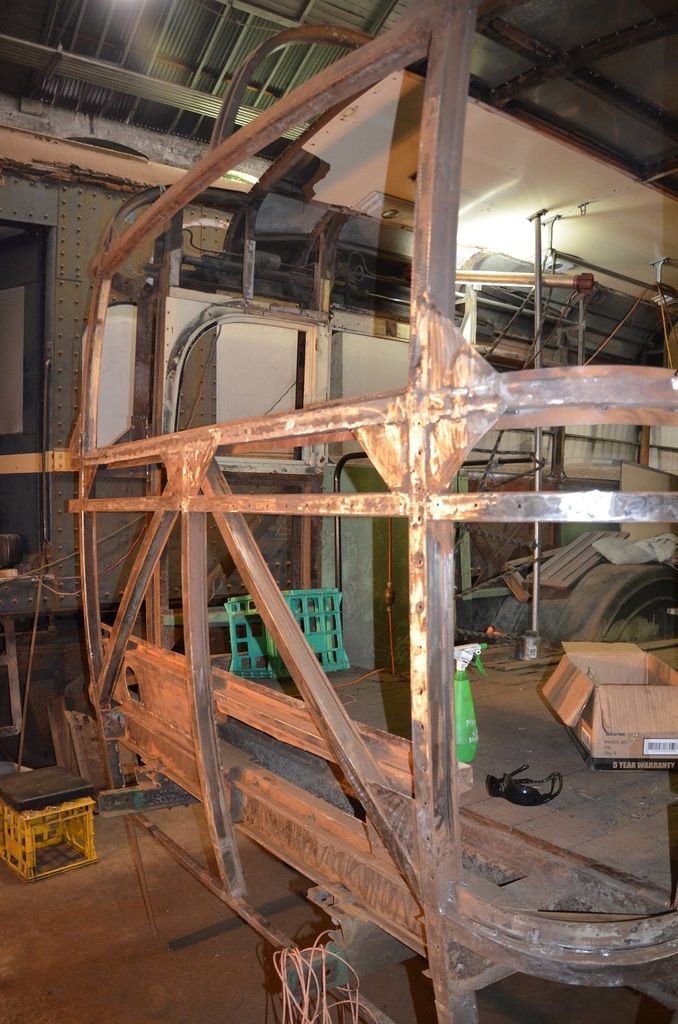
Image
Above: Here the rear frame work has been cleaned and is ready for inspection.
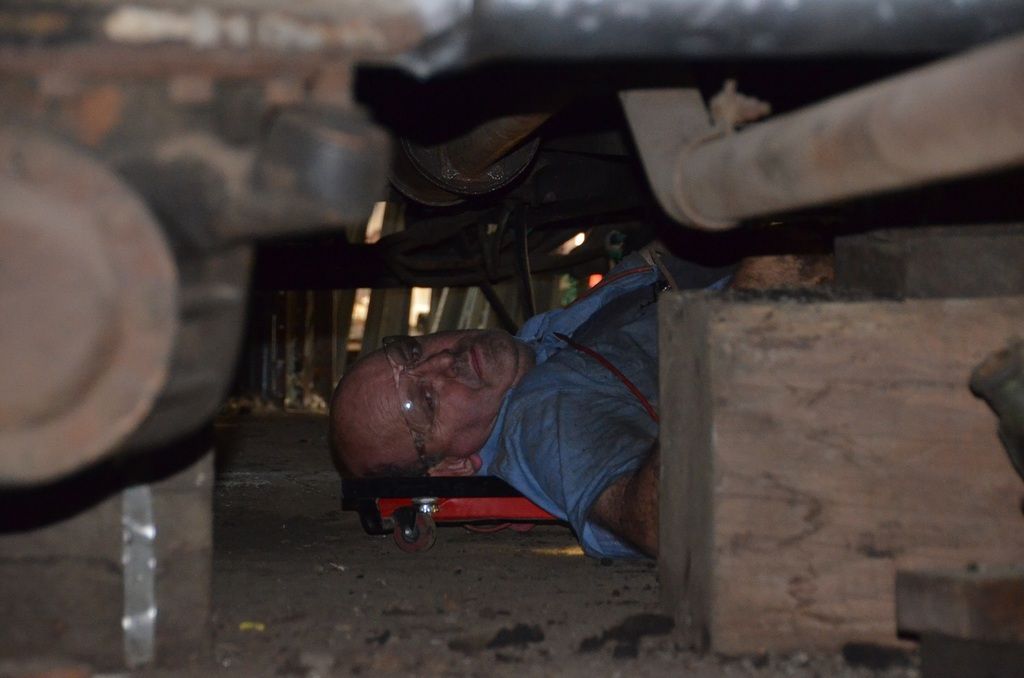
Image
Above: Shows myself on our mechanics trolley rolling along under the bus installing the new electrical loom.
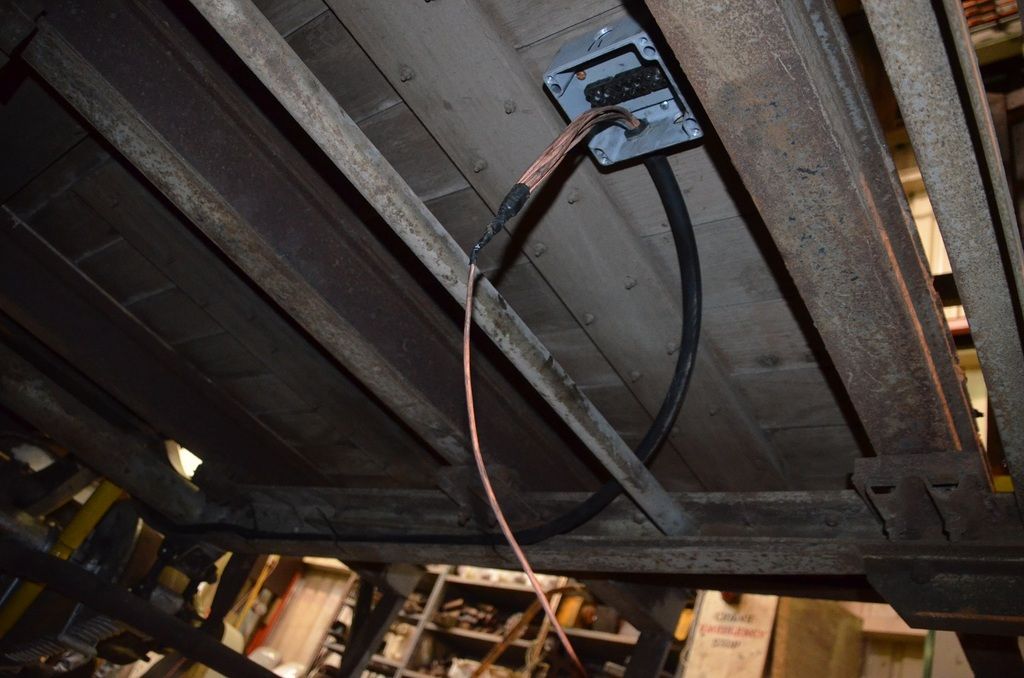
Image
Above: Here is the new junction box installed to terminate the wires coming from the front of the bus and where the wires heading out to rear lights will come from.

Image

Image

Image

Image

Image

Image

Image

Image
Above: The Eight photos above show in some detail the various frame repairs to the rear of the bus.
Image
Above: shows the first part of the near side frame repairs completed, this area was very badly decayed, and this involved setting the frame to the rolling clearances for the rear door. We needed to complete these repairs in order to complete the rear frame repairs.
Image
Above: The new loom to take the two wires over to the warhead brake switch.
Image
Above: Here we see the rear frame work has been inspected and passed, it can now be painted.
Image

Image
Above: These two photos show me painting the rear frame work.
Image
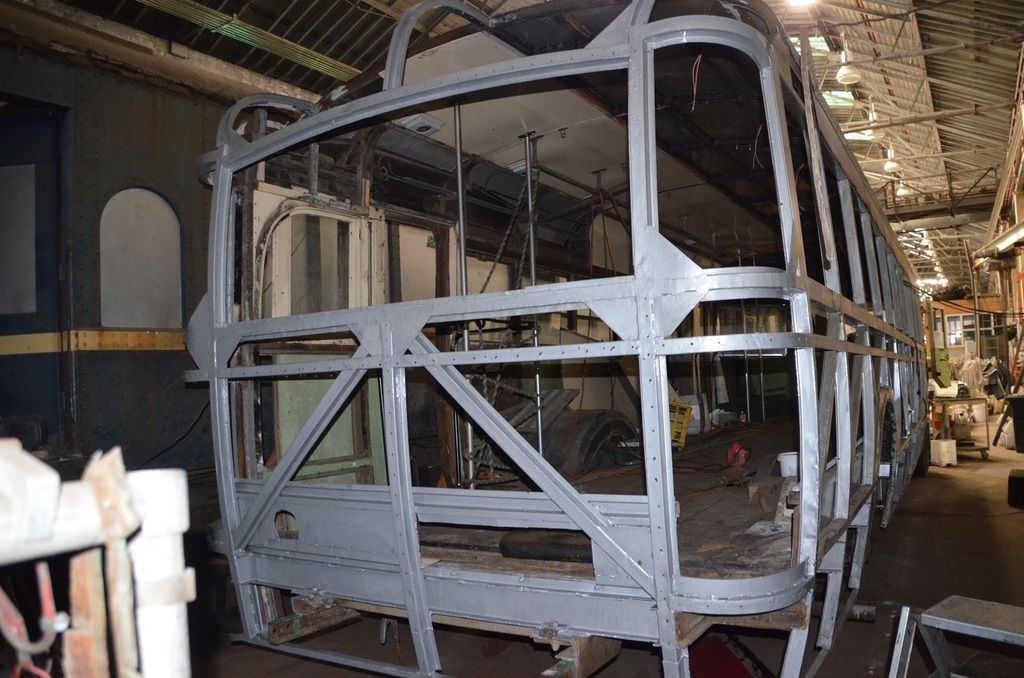
Above: The completed rear frame repairs after painting.
Image
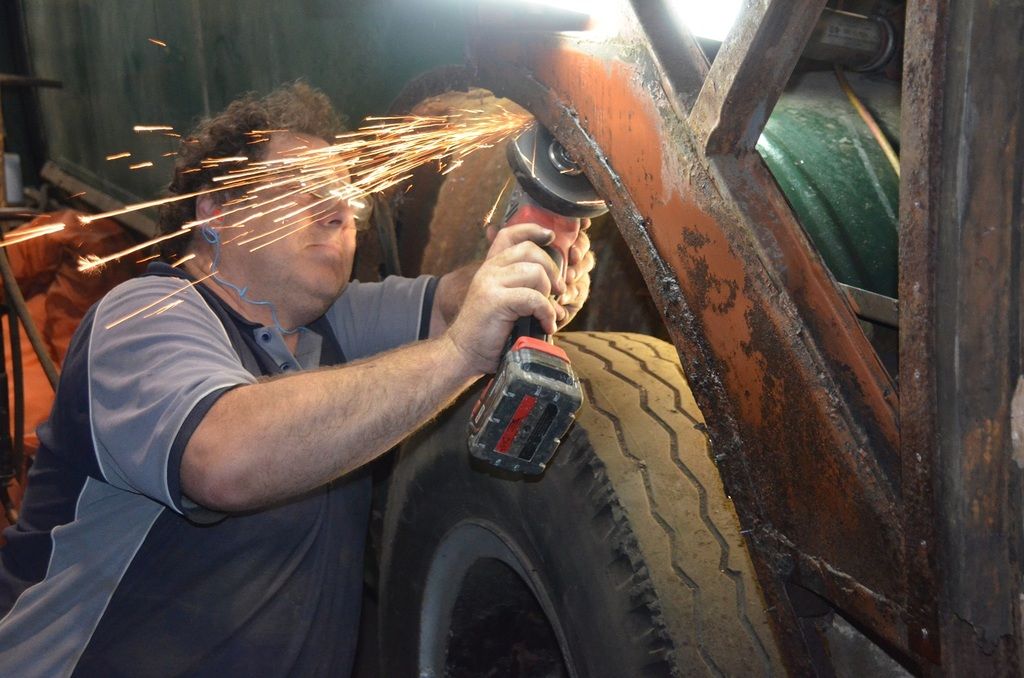
Above: John makes the sparks fly, as he removes the decayed and seized securing bolts to remove the near side rear wheel arch so the chassis strengthening members can be removed.
Image
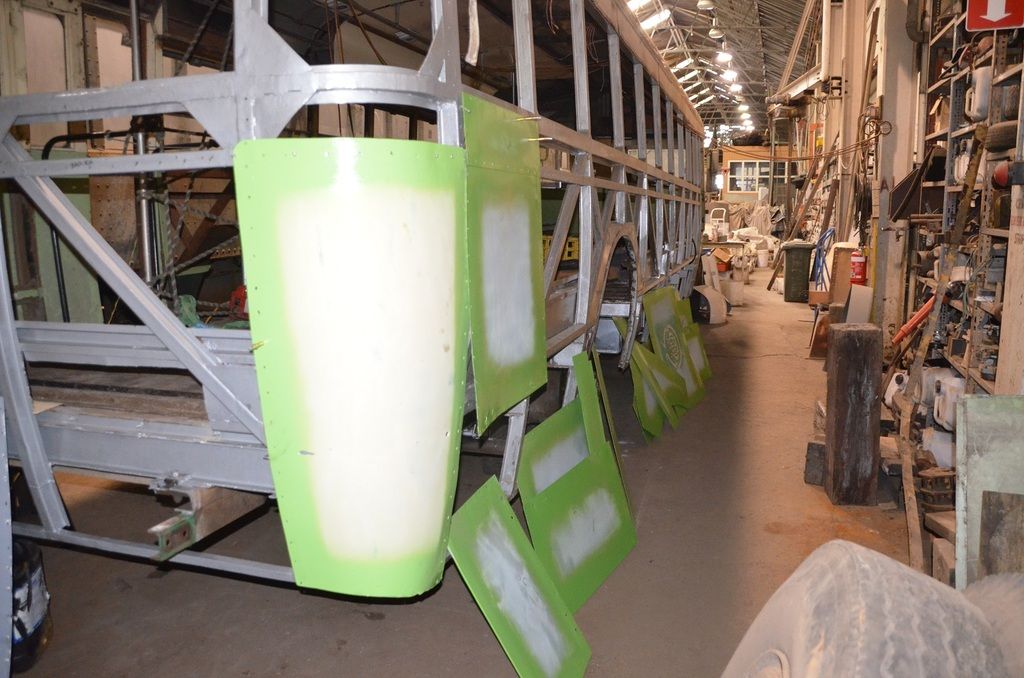
Above: The off side exterior panelling being rehung on the bus frame to ensure they are correctly fitted before being permanently attached.
Image
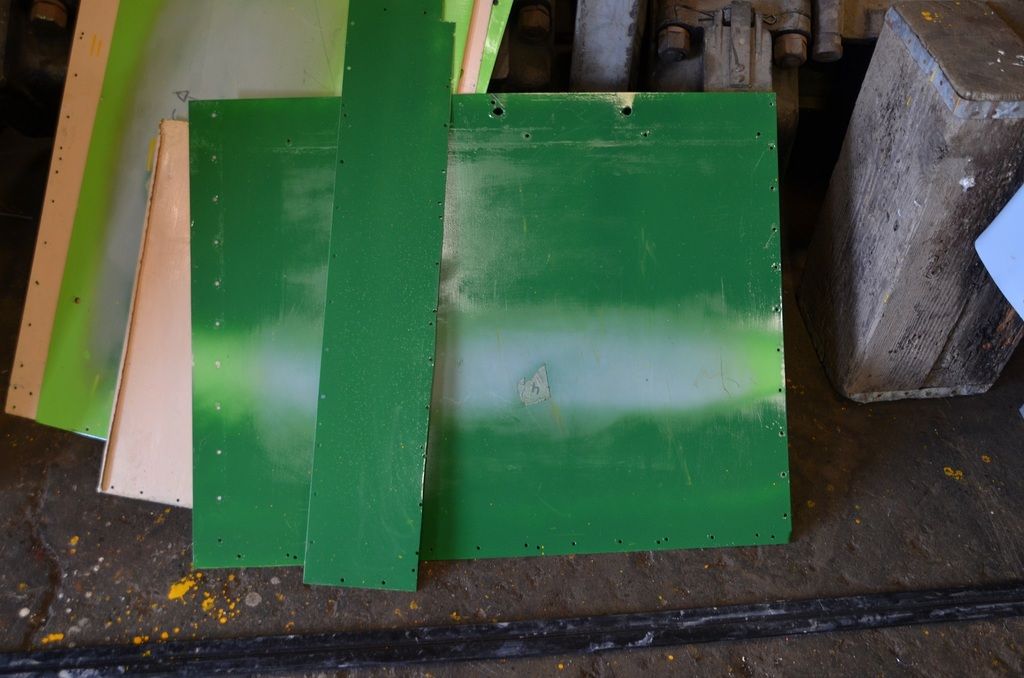
Above: This shows the correct colour paint applied to two test panels, this is the colour we obtained after paint matching AEC 537. It was unfortunate that the location where the panels had been painted had a pin hole in the roof and deposited fine water droplets onto the wet paint, lucky it was only a test! Our thanks is extended to the Bylands Tram Museum for their help and assistance in achieving this paint match.
Image
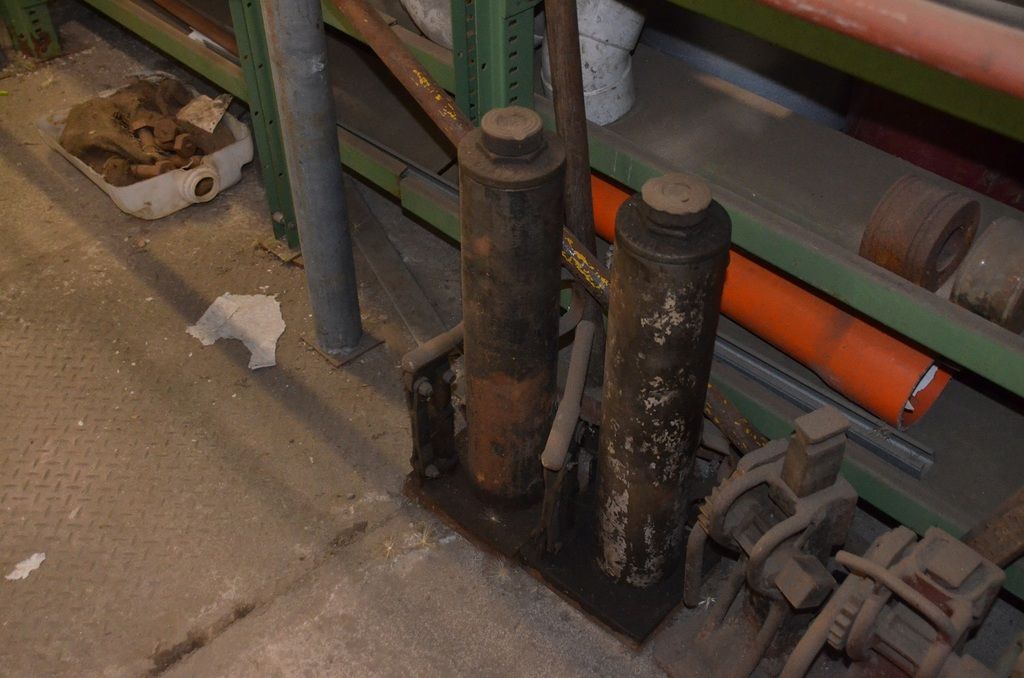
Above: These are the two jacks that will be used to lift the chassis once the repairs are completed, we have manufactured top caps that sit on the top of the ram and locate under the chassis rail.
Image
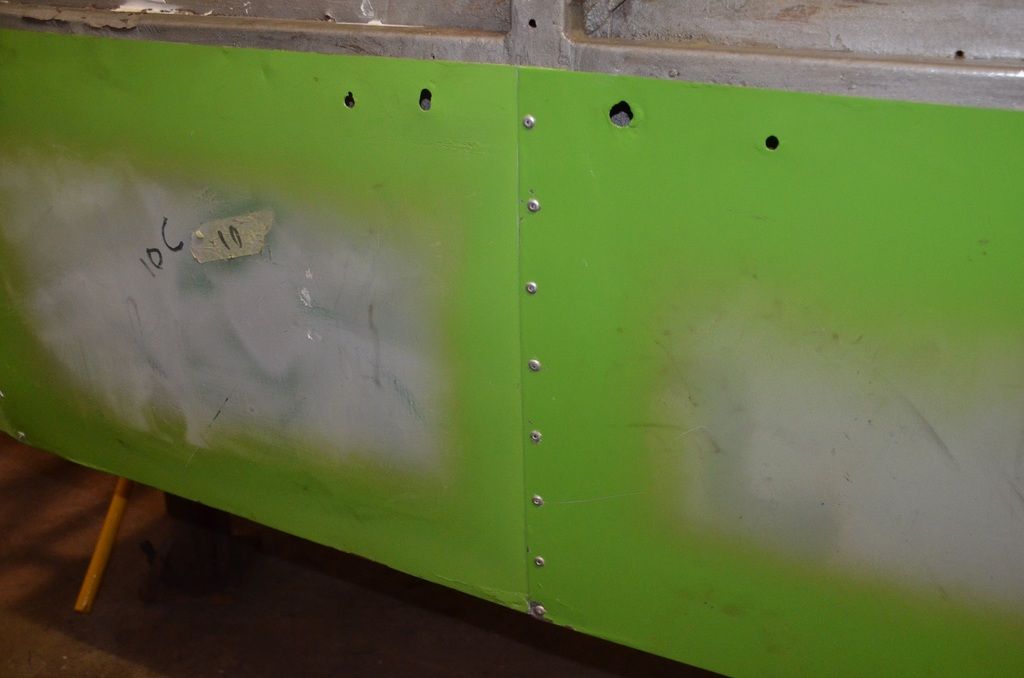
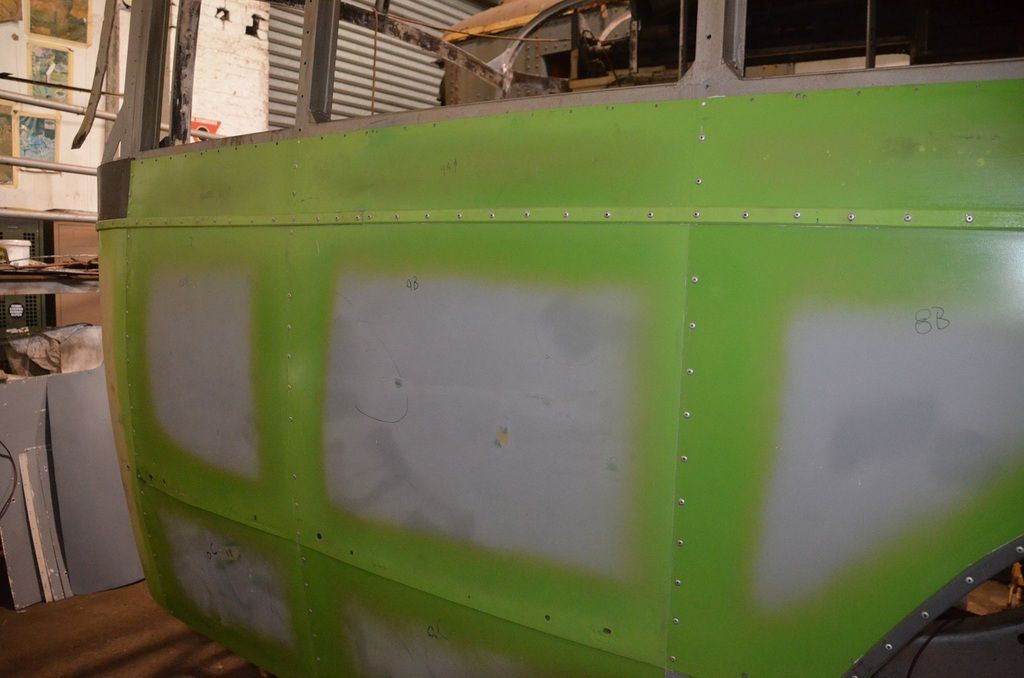
Above: We called the bottom panels, C panels, the larger panels above them were B panels and the small panels above them were the A panels, all the panels were numbered 1 starting directly behind the drivers cab and then were consecutively numbered to 10 at the rear of the bus. Here we see panel 10C and 9C joined with our sealant applied at the lap joint of the two panels. The panels are not sealed to the frame.
Image
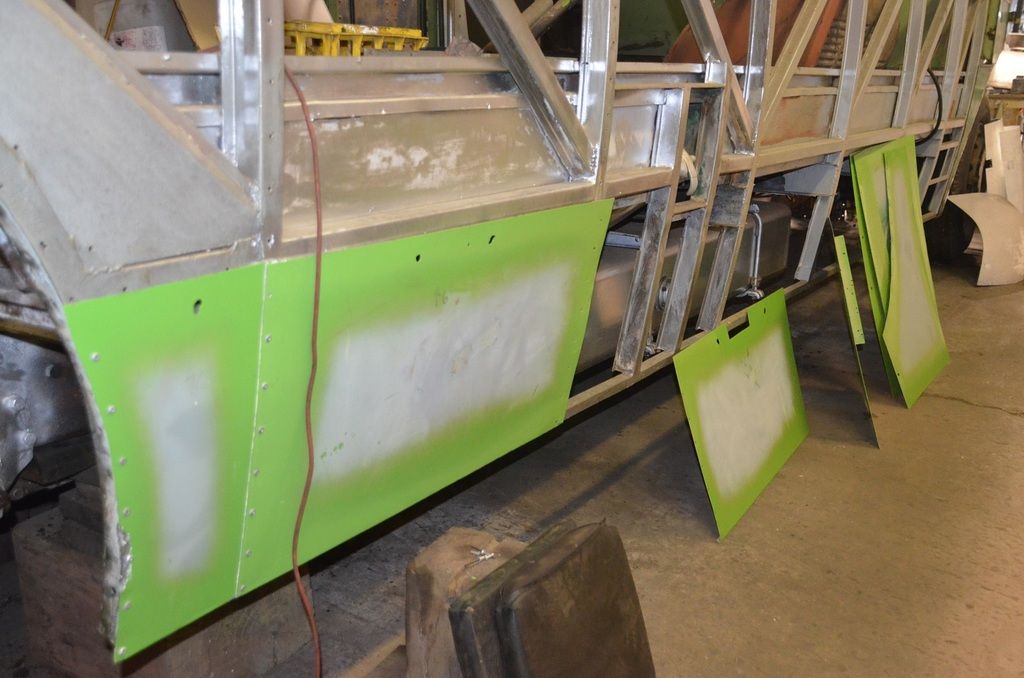
Above: Here we see another view of the lower panels, here on the other side of the wheel arch moving toward the front are panels 7C and 6C joined and pop riveted onto the bus.
Image
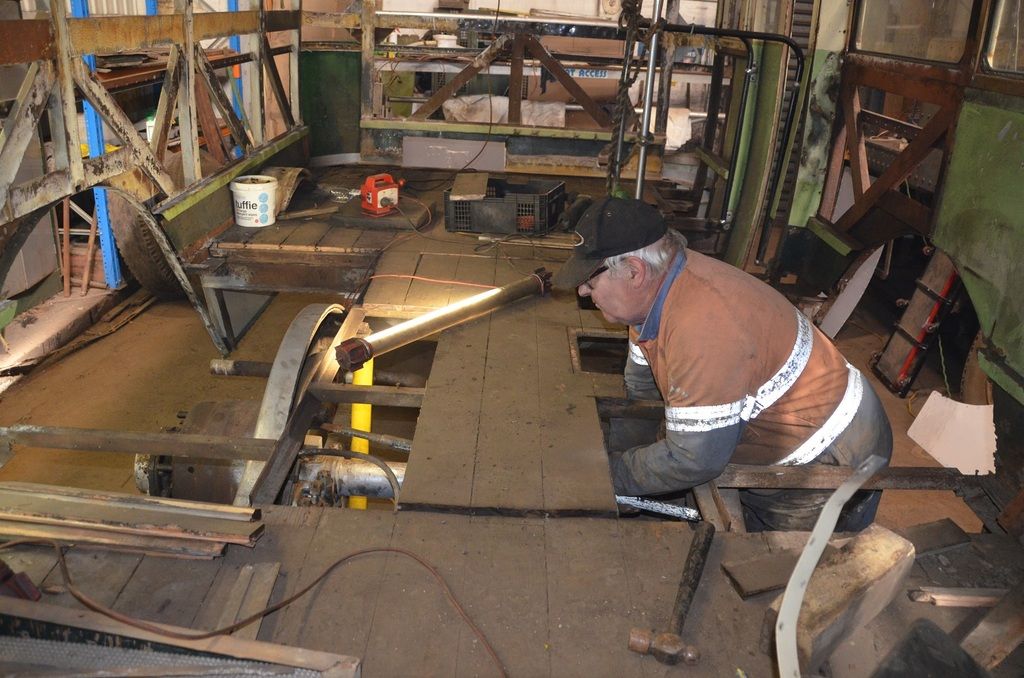
Above: Here we see Max in the process of removing the centre floor section over the rear suspension unit this needed to be completed to give us working room to remove the chassis strengthening members, eventually the forward and rear sections would also be removed.
Image
Above: The heads of the bolts and the chassis are marked with numbers to ensure the same bolt fits back into its respective hole these are fitted bolts and were a cow to remove.
Image
Above: The B panels are in the process of being installed, these lay over the top of the C panels to allow rain water to run of the higher panel onto the lower panel. Join our Patreon Channel and view “On the Buses – 2018 – No.1” to see the video of the installation of the exterior panels.
Image
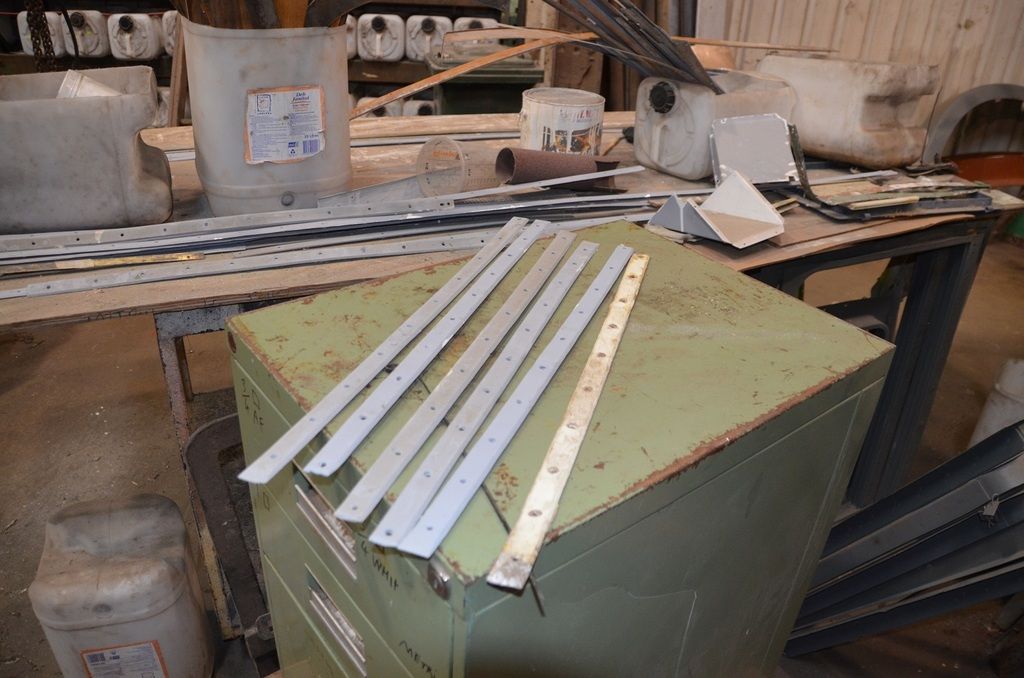
Above: We were left with a jigsaw puzzle as we did not mark the dress strips as they were removed, so after about three days of trying them in various locations we finally identified where they all fit. These are some of the dress strips that fit between window sills.
Image
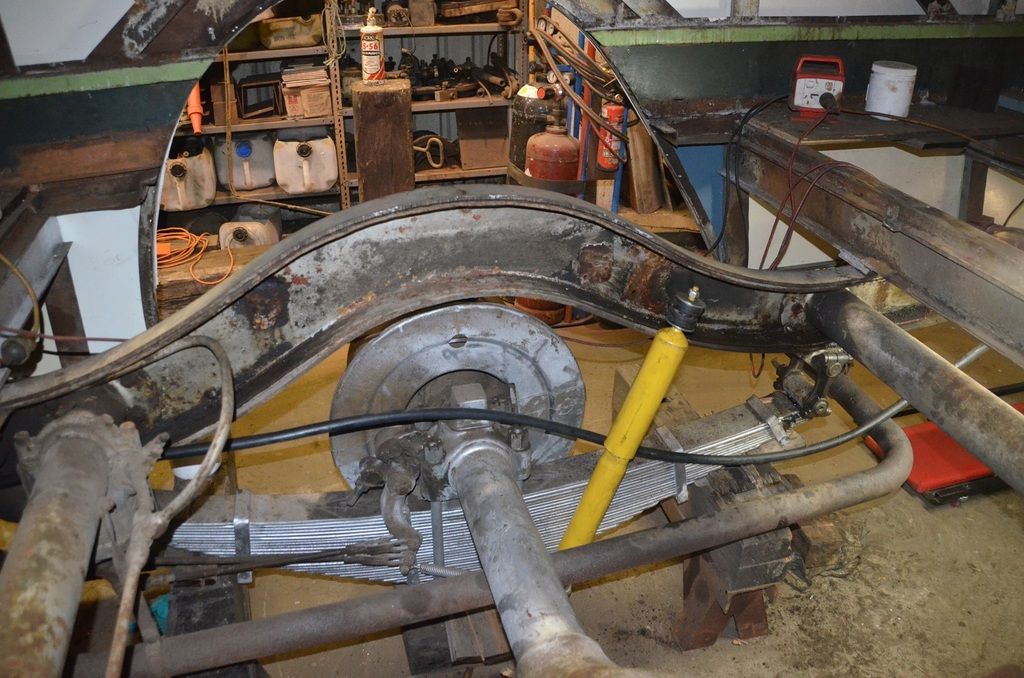
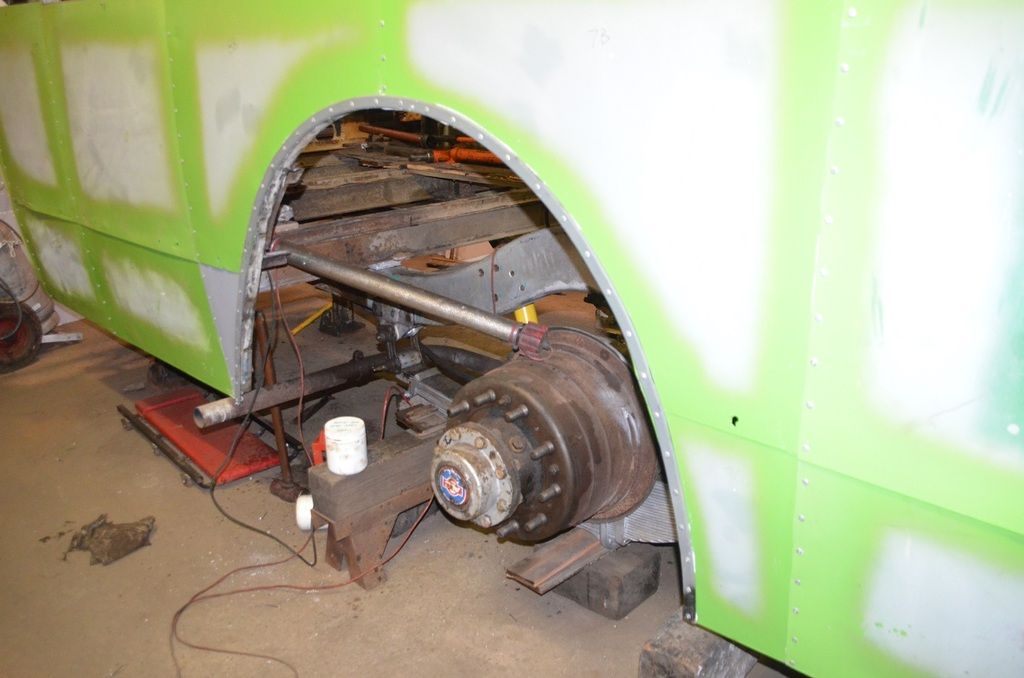
Above: Removing the components to allow the chassis strengthening members to be removed.
Image
Above: We see the off side wheel arch dress strip secured in place with the pop rivets.
Image
Above: This is a view of the Left Hand Off Side (LHOS) with most of the fitted bolts removed. The normal bolt you see in the photo is to hold the suspension casting, chassis strengthening member and the chassis rail together as the porta power was applied, prior to the application of these bolts the three parts were separating.
Image
Above: The dress strips are identified and put in place with our small bolts, they are ready for installation.
Image
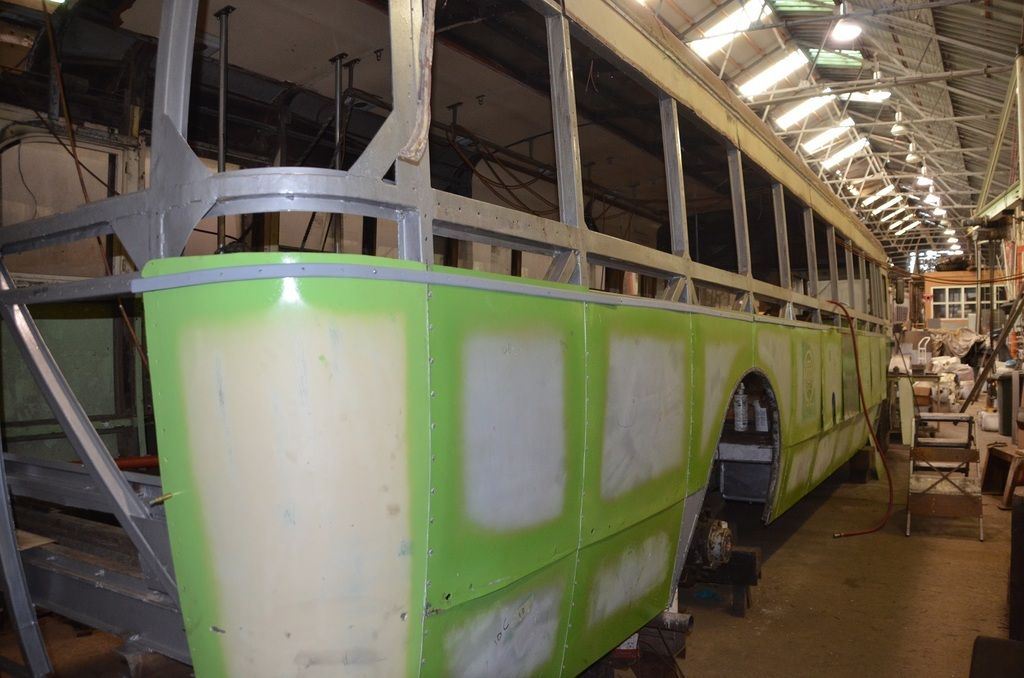
Above: With the C, B, and A panels correctly identified, we see the rear panels installed with the dress strip applied, this lifted the spirits of the restoration crew as it looked great.
Image
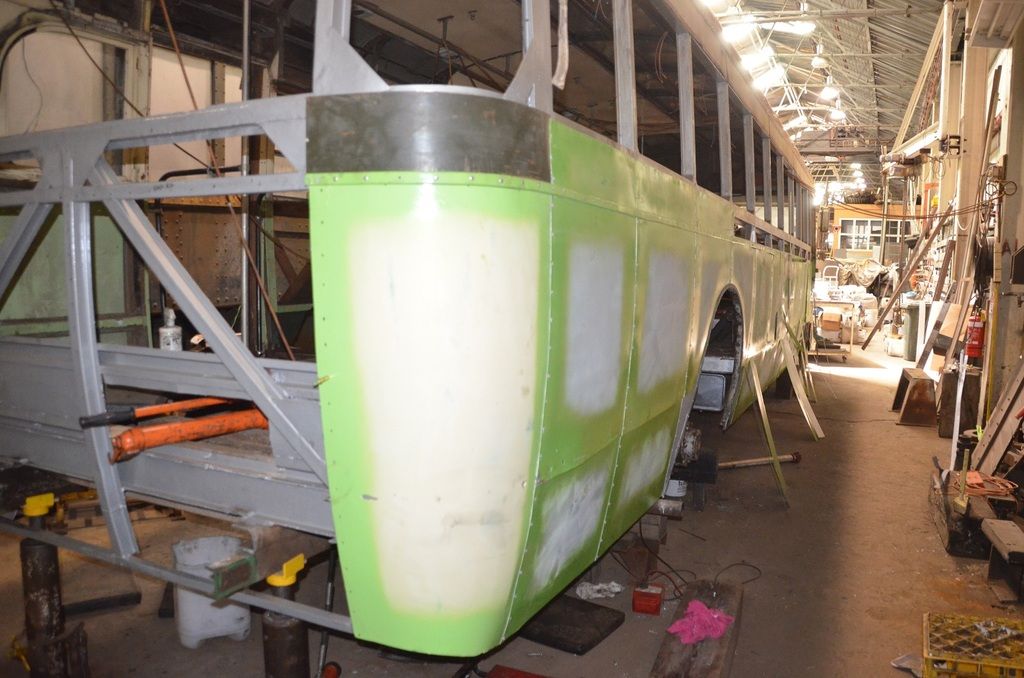
Above: Here is a view from the rear of the bus as the off side exterior panels are being installed.
Image
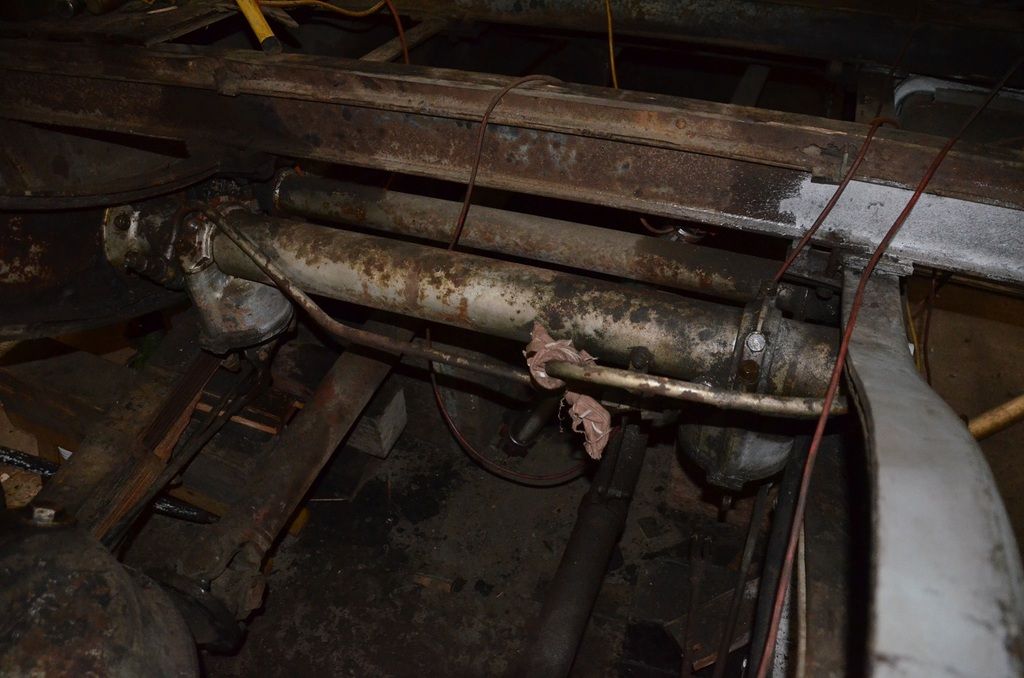
Above: With the brake lines disconnected the brake cylinders are ready to remove. Join our Patreon Channel and view “On the Buses – 2018 – No.2” to see the video of the removal of the brake cylinders.
Image
Above: We see the right hand near side bolts being removed from the chassis stretcher and the suspension casting to enable the chassis strengthening member to be removed.
Image
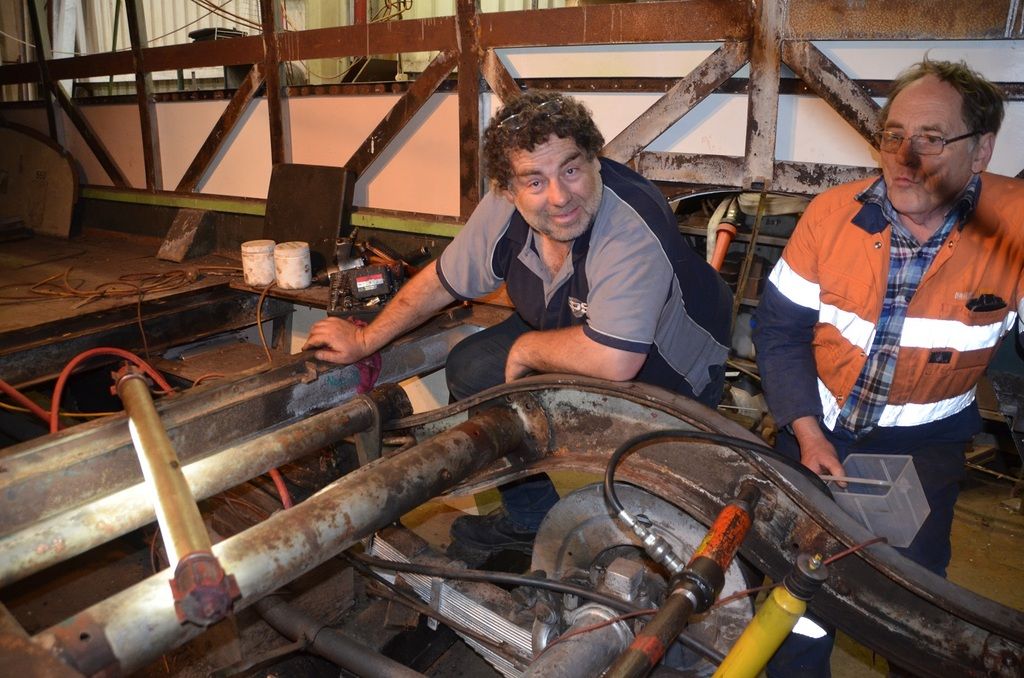
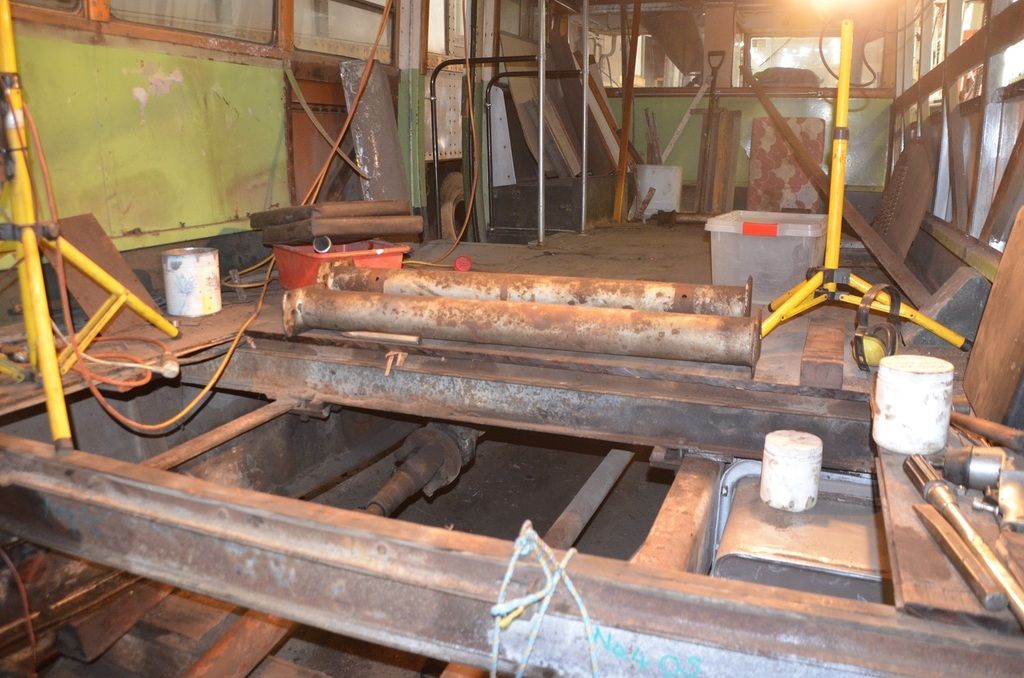
Above: This is real progress, right here, the hand brake cross shaft has been removed, we thought it was a chassis stretcher, DOH!
Image
Above: Again, this is real progress, right here! Here are the two chassis stretchers sitting on the floor of the bus. Now nothing was physically holding the chassis strengthening members in place, right! Wrong! All that rust would not release the chassis members, they were not coming quietly so the time had arrived for drastic measures. Join our Patreon Channel and view “On the Buses – 2018 – No.6 & 7” to see the video of the removal of the chassis strengthening members.
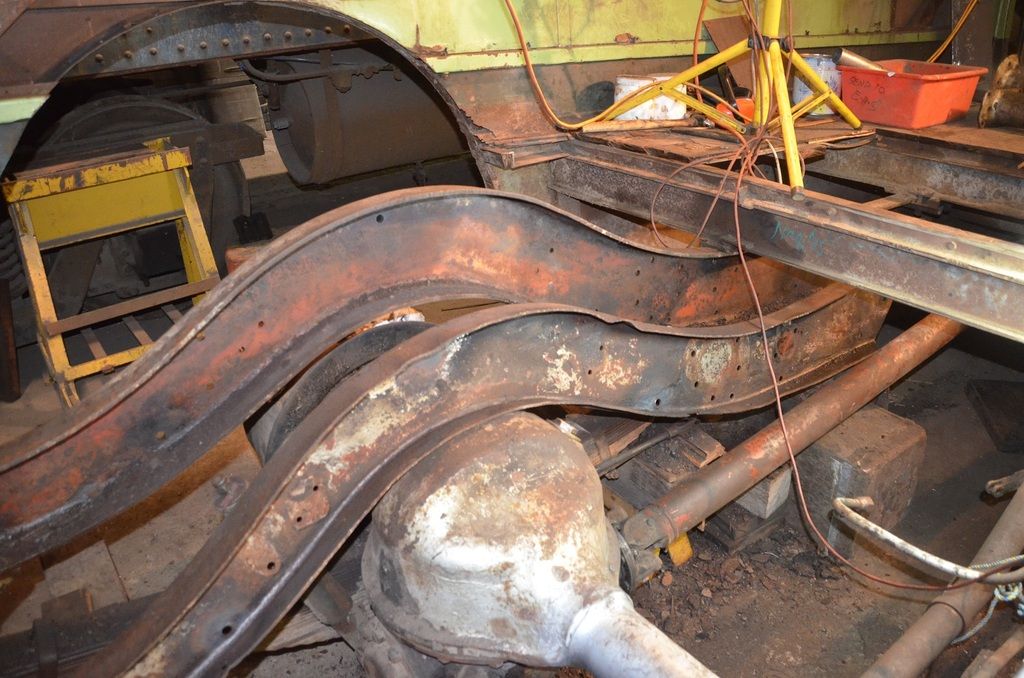
Image
Above: Here is the near side chassis strengthening member out from its position and sitting on the rear differential unit.
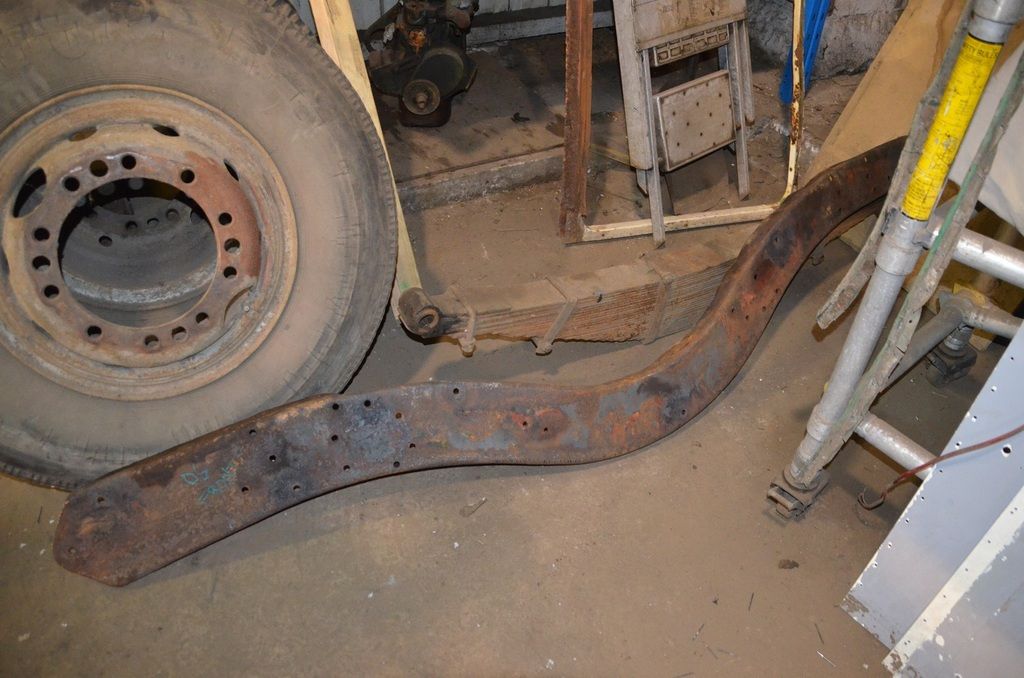
Image
Above: This is the off side chassis strengthening member out from its position and sitting on the floor, as can be seen in the photo the strengthening unit has been marked to identify its location.
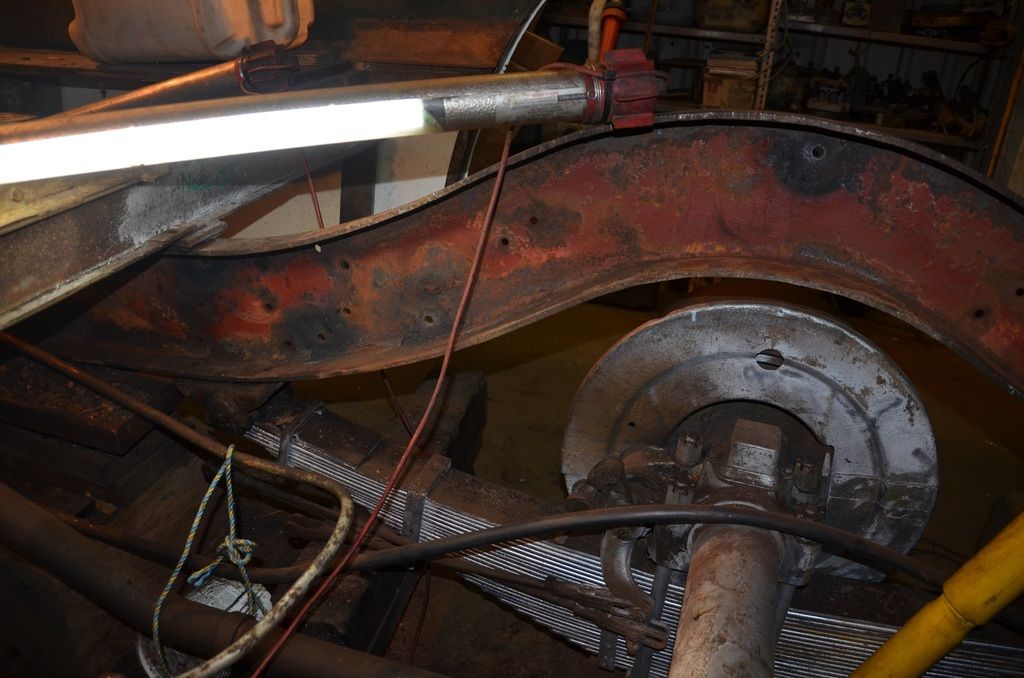
Image
Above: After the chassis strengthening member was removed it gave us the first look at the actual chassis rail. And surprisingly it looked to be in excellent condition, although that was only our observation, this was later confirmed by our accredited VicRoads engineer.

As always, my post would not be complete without a rail motor photo, (we like rail motors!)
Image
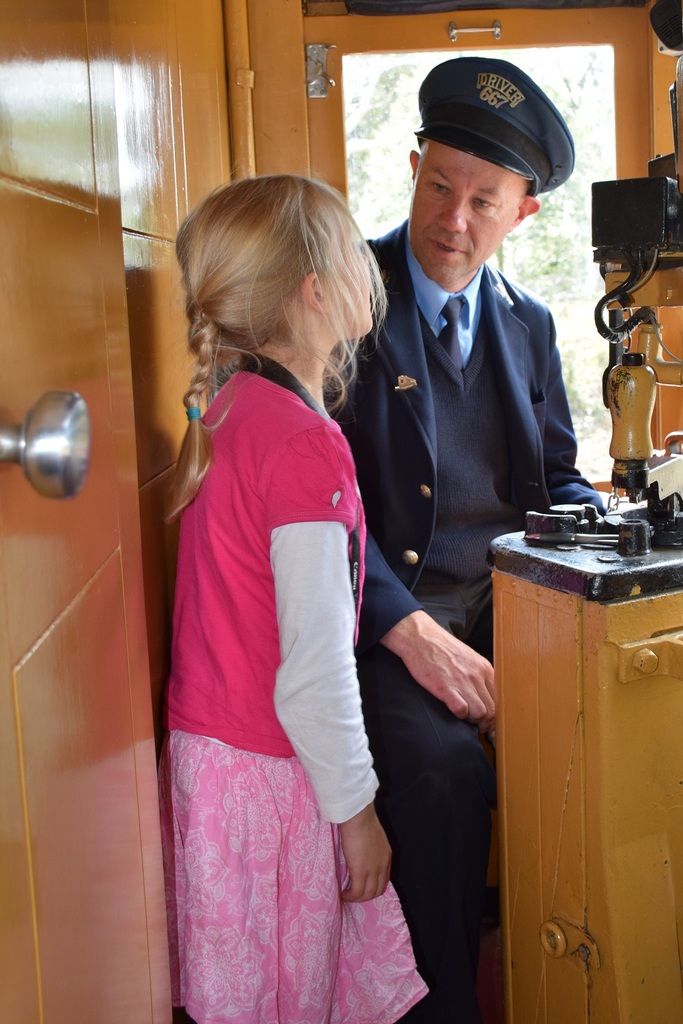
Above: Charters form an important part of our business, milestone birthdays are some of these charters. Here we see our tours manager in his post as a V/Line Driver at the controls of 58 RM during a charter, he is in deep conversation with one of the younger members of the charter group, after she enquired if it was hard to drive the rail motor. The picture speaks a thousand words.

Well, I think you will have to agree that this is probably my most comprehensive report yet! If you want something more comprehensive then Patreon is for you! That is it from me for now, so I will see you next year in the next post, unless you become a DERMPAV patron through our Patreon channel. As always, feel free to comment if you want, we like to receive your comments and read what you are thinking, or what you think of our restoration project, you can ask questions, share your thoughts on our project, offer constructive ideas, or offer us festive season greetings. It really is up to you. We just like to hear from all of you, who sit each year and catch up with what is going on in the restoration of AEC 560. I really hope you like the video, when it was first proposed, I thought I might be a bit nervous doing it but, in the end, I think I have warmed to it. I still say um! a lot. But I am working on that!

My how time goes quickly, another year has past since my last post! Christmas is a marvellous time. A time for family gatherings and catching up with good friends, then all too soon Christmas is over and we are celebrating and welcoming in the New Year, and then we are off again!

So on behalf of DERMPAV, I would like to thank you all for keeping abreast with the progress on AEC 560 and I would like to extend our sincerest best wishes for the coming festive season to yourself and your family. We hope you stay safe and we look forward to you joining us next year, either here or through our Patreon Channel where updates continue as AEC 560’s restoration progresses with its ultimate return to heritage service.

Regards
Colin Kelly
Secretary
DERMPAV
User avatar
AEC 531
Posts: 39
Joined: Sun Feb 26, 2012 5:25 am
Favourite Vehicle: AEC Regal mark III bus
Location: Newport

Re: AEC 531 A Regal Mark III bus

Post by AEC 531 »

Hi Everyone,

Not sure what has happened, but after my annual report that I post, I usually receive a few comments of encouragement, but this year not a squeak. I am not sure if I have put you all into sensory overload with the annual report, the 40 minute video on the years progress or the thought of being able to receive regular updates through our Patreon Channel.

As it turned out we had made an error on our Patreon channel, we were charging $15.00 USD which equated to about $21.00 AUD, this was never our intention. We have corrected this now, the pledge amount is now set at $4.00 USD which equates to about $5.50 AUD. As it turns out, Patreon is not a good platform for this media, there is not much flexibility for creators, (people that post video content), to adapt to the lack of patronage or increase patronage. We wanted to adjust our current tier commitment and were told that we couldn't. So we created a new tier with an adjusted pledge amount of $4.00 USD. We have uploaded so many videos mainly on the restoration of AEC 560 to the platform that it is just not an option to close it down.

When we set up the page it asked us which currency we wanted to use, we advised we wanted to deal in AUD, but the pledge amount is in USD, as patreon is an American company, this was not made clear to us until one of our patrons advised that they were being charged $21.00 something, so we looked into it and discovered the problem.

So I guess, I should get off my soap box now. The purpose of this communication is to advise you all that the Patreon option, should you decide to take it up, will only cost you $5.50 AUD approximately a month, over a year this totals $66.00. We would like your financial support and hope the lower pledge amount will create some interest. I know loads of bus enthusiasts are reading this as our page views have gone from 29,202 page reads to 32,529 page reads, that is a little over 3,300 page reads in three months. Many thanks to all those that take an interest in my annual report.

The progress that we have made this year is startling, even I have to pinch myself and wonder how much further advanced we will be at the end of this year. At the end of last year the bus team sat down and decided on a set of goals that we wanted to achieve to AEC 560 by the end of the year. We thought that we would be happy if these were achieved, some thought they were a bit ambitious, now it looks like we are going to smash them to pieces and be much further advanced than we thought possible at the start of this year and that was only two months ago.

If you wish to become involved in the restoration of AEC 560 please drop us an Email at info@dermpav.net.au and our webmaster will pass this on and I will then write to you and formally invite you along to our next working day. the more people involved the more that gets done.

Sorry about the advert for Patreon, we do sincerely hope you come on board it would be great to see a few more enthusiasts on our channel.

Regards
Colin Kelly
Secretary
DERMPAV
Boff
Posts: 24
Joined: Thu May 26, 2011 1:27 pm
Favourite Vehicle: MCI MC7 and early Denning's
Location: Gippsland, Victoria.

Re: AEC 531 A Regal Mark III bus

Post by Boff »

Hi Colin,
Im not sure what happened but I got a notification that there was new and exciting reading re the Non DERM project and clicked on the link with bated breath...
Not a Sausage, Nada and Zilch so I clicked the link again and still no new post.
I browsed about the Site for a while and got distracted by life and my wifes sadly impressive list of Tasks I am bound to complete (Written caligraphy style on a roll of heavy duty cotton workshop towel) and immediately lost the will to continue with any form of internet enjoyment and slouched off to Mow lawns and paint letterboxes.
I did revisit the new post some days later and read it with furtive enjoyment (Lest SWMBO redirect my attention to the growing Job Scroll) and promptly forgot about the post
Its not that I dont value the contributions you make and they are an incredible blend of 2 things I absolutely love being Choo Choo's Toot toot's and stuff that grumbles crunches and belches black smoke but the combination of the Notification shenanigans and the Wife's Soul sucking Blue Scroll of mediocrity and modern slavery just whisked away my Enthusiasm for a wee bit.
I Promise to be more enthusiastic in future and as an aside the Blue Workshop towel scroll seems to have been relocated to somewhere safe and unknown.. I suspect the Bore and Hone task added to the top of the to do list may have something to do with it and the intrinsic nature of workshop towel is of course to absorb and protect.....
User avatar
AEC 531
Posts: 39
Joined: Sun Feb 26, 2012 5:25 am
Favourite Vehicle: AEC Regal mark III bus
Location: Newport

Re: AEC 531 A Regal Mark III bus

Post by AEC 531 »

Hi Boff,

Well that is odd, am I correct that you were not able to get either of the links to operate? I have just activated both the Patreon Link and the Bus Australia Video on You Tube link through the post and both are working ok, so I am not sure if it is my computer as I posted them or if the wider world cannot view them.

Sorry about the ever increasing task list generated by your GLW, such is life, could you let me know if the links in the post above are actually working. Thanks

Regards
Colin Kelly
Secretary
DERMPAV
User avatar
The Cap a tan
Posts: 490
Joined: Sat Oct 01, 2005 10:25 pm
Location: Mooroolbark

Re: AEC 531 A Regal Mark III bus

Post by The Cap a tan »

Thanks for the update Colin. A huge amount of work has been done since I last saw the bus in the flesh. With work and life commitments I don't get a lot of time to visit here, let alone get much work done on my Volvo B59. It looks like you have an enthusiastic team doing the work.
The paint matching you talked about can be hard, I know John Phillips has trouble matching the colour for minor touch ups on his AEC, due to the old lead based paint used originally.
Rclasstramcar
Posts: 1318
Joined: Tue Nov 03, 2009 8:36 pm
Favourite Vehicle: 1955 Morris Minor-1961 Hillman
Location: I'm not sure

Re: AEC 531 A Regal Mark III bus

Post by Rclasstramcar »

How often do these buses come up for sale? I haven't seen one in ages.

Ben
Return Sydney's trams
Vote Morrison and his Government out this election.
JAN 26-INVASION DAY
User avatar
AEC 531
Posts: 39
Joined: Sun Feb 26, 2012 5:25 am
Favourite Vehicle: AEC Regal mark III bus
Location: Newport

Re: AEC 531 A Regal Mark III bus

Post by AEC 531 »

Hi Rclasstramcar,

Not sure how often they appear for sale, they come up sometimes on Gumtree and other places.

Regards
Colin Kelly
Secretary
DERMPAV
User avatar
AEC 531
Posts: 39
Joined: Sun Feb 26, 2012 5:25 am
Favourite Vehicle: AEC Regal mark III bus
Location: Newport

Re: AEC 531 A Regal Mark III bus

Post by AEC 531 »

Hi The Cap a tan,

So far, even by our standards, we are making huge progress and it will be interesting to see how far advanced we are at the end of this year. We are currently on track to surpass our our own expectations of where we thought we would be at the end of the year.

The paint match, once we were next to the AEC 537 was fairly accurate, we now have the paint formulas to continually reproduce the paint required to keep painting the bus as things progress.

Thanks for the comments

Regards
Colin Kelly
Secretary
DERMPAV
Keats
Posts: 19
Joined: Mon Jun 02, 2014 3:22 pm
Favourite Vehicle: Comair Bedford SB3
Location: In front of the computer...

Re: AEC 531 A Regal Mark III bus

Post by Keats »

Just signed up to the Patreon account (chose $7.50 a month as the amount, rather than the default $4). Hopefully, a few more will do the same!
User avatar
system improver
Posts: 2893
Joined: Fri Dec 29, 2006 8:38 am
Favourite Vehicle: 1949 MBA Seddon
Location: Melbourne

Re: AEC 531 A Regal Mark III bus

Post by system improver »

Keats wrote:Just signed up to the Patreon account (chose $7.50 a month as the amount, rather than the default $4). Hopefully, a few more will do the same!
The videos are great - you can not only see the progress but, at least in my case, learn a bit about how buses are (or were) built.
User avatar
AEC 531
Posts: 39
Joined: Sun Feb 26, 2012 5:25 am
Favourite Vehicle: AEC Regal mark III bus
Location: Newport

Re: AEC 531 A Regal Mark III bus

Post by AEC 531 »

Hi All,

I have to jump up on my soapbox and advise that I have become very disappointed in the hosting organisation that holds our photos. After using their platform since we started this post in 2012. They recently decided that we need to pay an annual service fee to continue using that platform. As a result, I will not be posting any further photos with these reports. We have had the NBN installed at our home, this has greatly improved the upload and down load speeds and has turned a twenty-minute video from being a five-hour affair to up load on the old ADSL system into a time of fifteen minutes over the NBN. So, moving forward I now intend to create a short video of the photos with a verbal explanation for the captions of our progress and use YouTube to hold that video. My apologies for the blurred images and the Photobucket emblem that now appears.

I would also like to say before we start, our progress this year has been, if I say so myself, extensive! It is covered in extreme detail on our Patreon Channel. After feedback from some of our patrons we have decided to, in addition to numbering the video segments to also provide a brief description of their content, at the time of writing we are now up to segment No.33 in the “On the Buses” for 2019 there are another ten available for 2018. Further, our Patreon journey has progressed and a decision was reached to release these videos as they achieve their annual anniversary. At the time of this decision it was also decided to create Not For You Tube (NFYT) content that takes our patrons more deeply into some aspects of the restoration progress of AEC 560. The re-arrangement of the driver’s dashboard with its new dash layout, the manufacture of the new driver’s gauges is the first of those segments. Only our Patrons will be able to view these segments. While I am talking about our Patrons, we would like to extend our sincerest thanks to those that have come on board early in the piece and have continued the financial support that we receive, this support is greatly appreciated. We hope the videos are both instructive and informative and keep them abreast of the happenings surrounding AEC 560. For them this post will be superfluous, as it just touches on the highlights of the year.

The festive season approaches once more, it is the trigger to post my reflection on the progress made in the restoration of AEC 560. So, with that, we should get into the report of providing the progress, in the restoration of this bus.

At the end of 2018 on the off side, we had replaced all the lower exterior panels added the dress and advertising strips. It looked great, finally we were replacing parts, restoring stuff as we went. We had removed the chassis strengthening members and discovered that they were in need of serious repair but our Vicroads Accredited Engineer had already informed us that we could carry out those repairs. After removing these, which by the way was a huge job, we cleaned up the chassis rails with a needle gun and these were inspected, it was determined that the chassis rails were serviceable. I can tell you; the whole group breathed a sigh of relief! If these were condemned, DERMPAV did not have the resources, materially or financially, to manufacture a new set of chassis rails, our Vicroads Accredited Engineer made it clear, that would be the course of action that would be required if they failed. After they passed, we were elated! The episode where we interviewed our Vicroads Accredited Engineer on this inspection is on our Patreon channel.

With the chassis strengthening members removed we set about repairing these, our Vicroads Accredited Engineer’s provided excellent guidance, his first request was for us to remove a good section of steel from the chassis strengthening member and send it out to have it analysed. He wanted us to be sure that the repairs we were undertaking were with the same material, or the closest material that was available today, as the parent metal that was used in their manufacture back in 1953. This test was not cheap, but it was necessary. The lab provided a certificate to determine the steel the chassis strengthening member was manufactured from. They then suggested the closest steel available today that would be suitable for the repairs. We procured a piece of that steel with a certificate from the steel merchant to attest that this was the correct material, this providence was vital to the final sign off of the bus. Then Max set about carrying out the plethora of repairs required to put the chassis rail strengthening members back in serviceable order. Taking loads of photos of the steps involved for our Accredited Vicroads Engineer. This took considerable time as the steel had to be formed into the curves taken by the chassis rail strengthening members to ensure these would fit back into the chassis rails. The repair of these is again covered in detail in our segments on our Patreon channel.

After we removed all the nuts and bolts that secured the chassis strengthening members to the chassis rail, we discovered that some of these were stripped or they looked like a dog had chewed on them. So, after procuring the correct hex section we set about manufacturing new bolts and nuts for the reassembly process. Being British Standard Fine (BSF) threads, and being fitted bolts they were not commercially available and had to be manufactured. These were stored in various plastic containers awaiting use, it took a long time to manufacture all these fasteners, but by now the bus restoration team were fairly cracking on. So, I had to speed up which meant longer days at Newport.

All of these components came back together by late August. I remember while we were sitting down having lunch, John made the statement “This will all be back together by Christmas”. Seriously, I thought! He is obviously delusional! But I underestimated those enthusiasms, and by mid-November, after a lot of toil it was back together. True to John’s word we had achieved what I thought was impossible. The only task that remains is the hot riveting of the chassis strengthening members back to the actual chassis rail, we have the rivets, but we need to borrow the riveting equipment, so that will occur in the new year. We started to think about replacing the saloon floor again, it was removed to allow access to the underfloor equipment at the rear.

Another huge bonus to the bus restoration team was the addition of two new members, one had in a previous life worked in England on the buses, and understood a hole manner of things that we did not have any idea about. The other had come out of the automobile manufacturing industry and also understood the various automotive concepts used on the bus, both of them formed a formidable team and dived right in achieving stella works. They are a great addition to the bus restoration team. To explain those statements, one of the next steps was to remove the actual rear brake assembly on the near side and determine why everything was oil soaked. While we could have done it, it would have taken much, much, longer to achieve not being familiar with the processes to achieve those outcomes. As an example, I was tasked with removing the brake drum off the spare diff, I spent a day trying to get it off and, in the end, determined that we needed the jacking bolts to initially get the drum off. We needed the rear guards to replace the missing ones on AEC 560. In the end I gave up and started seeking the jacking bolts which we did not have. Then Elvis and Peter started to recondition the near side hub assembly and it was discovered that the seal assemblies were not installed correctly and parts were missing, so we go out to the spare diff, the very same one I had attacked earlier, I told Elvis that we needed the jacking bolts to get the brake drum off, He replied, yes you should use them, but there is another, and quicker way to do it and 3 minutes later it is off. It is the difference between having experience and not. So, to make a point of it, they are a marvellous addition to the bus restoration team. While everyone thinks Elvis is working at McDonalds they are all wrong he is working with us on the bus, and yes, when he leaves our depot we cry out “Elvis has left the building”.

Peter and Elvis first assembled the chassis strengthening members to the chassis rails then commenced leading the team through the reconditioning of the rear near side brake equipment. The brake shoes on that side were useless, being completely oil soaked, this occurred from leaking rear hub seals, it was obvious from inspection that these seals had been improperly fitted, probably causing the damage to the seal on installation. It is doubtful if the brakes on that side were providing any braking effort with the amount of oil they were carrying; these shoes will require replacement. The nuts that secure the rear wheel studs to the hub looked like they had been chewed on by a dog. It became obvious that whoever put this together did not have the lock washers to secure the nuts in position to retain them. They had used a hammer and chisel to deform the nut and damage the thread of the stud, not pleasant indeed. When Elvis removed the brake drum off the spare diff it was found to be in pristine condition, he decided that we would transpose those hubs. Also, we have discovered water damage to the bearing shaft this takes the form of discolouration it was present on the bearings and the shaft, obviously this is rust, we intend to polish it out and then install new bearings. Elvis now intends to remove the rear off side and do this work there also. Work, it never seems to end on this bus. But we are determined to do it right in the first place, so we have no trouble with it in service. When it is finished, we are now intending to operate it out of Newport consistently for about two months to ensure we have no teething problems with the various systems we have repaired or installed, this will provide our operating staff with vital hands on experience, after that it will go into heritage service. I guess that will be the fun part! We will probably extend an invitation for our Patrons to join us on some of these trips to show our gratitude for their support and let them have a look at the finished product before it enters heritage service, they will just have to accept that it will be an adventure if it lets us down. But I guess that is part of the fun in sharing an experience.

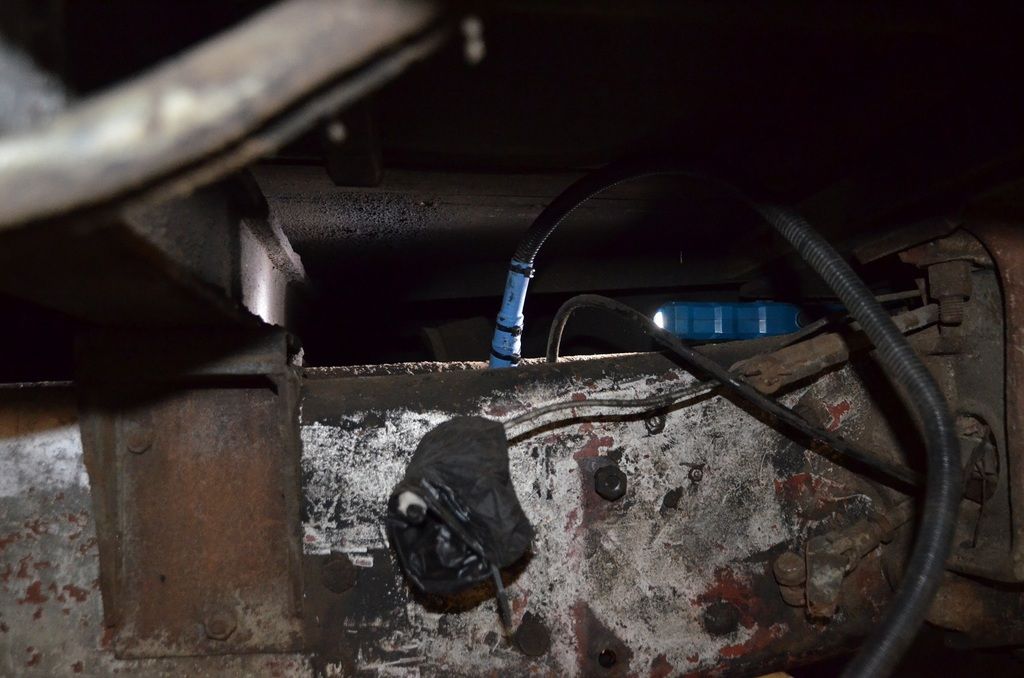
We also found that the chassis bump stop fitted to the top of the rear differential assembly on the near side had melted. Then we discovered that the near side rear brake assembly guards were missing. The heat generated when the brake was applied was passed directly to the bump stop, resulting in its damage. When we purchased AEC 560 it came with another Regal Mark III bus that had been reduced to spare parts, we sourced the near side rear brake guard assembly off the spare diff and it kindly offer up another set of guards, but in storage they had become damaged, in time Max will repair these and they will be fitted to AEC 560, as part of these repairs. We are lucky to have spare parts.

While on the subject of spare parts, as we were pulling out the suspension pins we were finding that these were very badly worn, in places we had a quarter of an inch (6 mm) play between the pin and the bush, very bad, that would never pass inspection for a roadworthy. The bushings were not an issue we could manufacture these on our lathe, but the pins were a problem as these were hard chromed to ensure the bush wore rather than the pin. That’s all good and well, but when the pin wears through the bush, the metal holding the bush in place then starts to make the pin sacrificial hence the extreme wear. We decided to establish the costs associated with having these pins repaired. This involved having the worn areas re-hard chromed and then re-machined to finished dimensions, so we sent one out for a quote, the quote we received back was frightening, $500.00 per pin, we required nine of these pins to be reconditioned, this would have cost us $4500.00 aghast! Who said bus preservation was cheap? We decided to reach out to the wider AEC bus restoration community around the world, through this we found some new old stock pins in England, after financial arrangements were concluded we acquired the nine pins for $1384.00, which also included freight to us, expensive yes, but cheap compared to having the old ones repaired. Things always need to be kept in perspective! The bus restoration team were elated when these arrived. For us it meant the near side suspension could be reassembled, we had manufactured and installed new bushes but needed new pins.

The bus restoration team had decided, as AEC 560 will be returning to heritage service, and it will be used a lot more than a normal heritage bus, we needed to provide a gauge that displayed the fuel level in the drivers cab to the driver. But this needs to be paired with a fuel level sender that sits inside the fuel tank. This then prompted our need to have a fuel gauge added to the sparse instrument cluster. The members of the bus restoration team had used AEC 507 to experience operating a pre selector gearbox spending a day driving it around the workshop, I must say, I believe they enjoyed the experience a little too much! This lead the conversation about other systems that also should be monitored, and the how difficult it is to view the current gauges. The current dashboard holds a collection of gauges that are at best described as hotch botch. The existing dashboard was very small and only holds the three gauges, there is no room for expansion. When the tramways added indicators to the buses, they added another section of dash board, further, the dashboard is located low in the cab and requires the driver to look over the steering wheel to look at the gauges. Keeping in mind that the roads network has become much busier since their retirement in 1980, and this is an 8 ton bus without power steering, we felt it important to redesign the dashboard altering the layout to accommodate better viewing of the gauges and install more gauges that better inform the driver about the systems onboard the bus, warning us to potential problems before they become troublesome. We do not want to discover that the engine is hot after steam starts pouring out of the radiator, when that happens it is already too hot!

We have decided to replace the existing battery charging generator for a more reliable alternator. The replacement alternator can produce 110 amps, this will be achieved when the engine is operating at 1800 rpm. But at idle the engine is only operating at 600 rpm and using the pulley that was on the generator, the alternator was simply not operating fast enough to produce voltage. We placed it on the test bench and discovered that the alternator needs to be running at 1278 rpm for it to generate power sufficiently to overcome the battery potential and defeat the reverse current diodes in the alternator allowing battery charging voltage to flow to the batteries. Below that rpm the alternator is a boat anchor and does nothing. I determined that with the crankshaft pulley of 170 mm the alternator required a pulley size of 60 mm this gave us a 2.83 ratio and would drive the alternator at about 1650 rpm, at that speed the alternator will produce a healthy 25 amps charge to the batteries when idling. So, I requested the auto electrician to supply that size pulley. Are you mad? He said, they don’t make pulleys that small, the standard is 93 mm. No sorry, to large! I replied. Well the only way you will get one is to specially make it on a lathe, that will cost heaps! So, after some design, I again hoped on the lathe with a piece of steel and turned one up, I am not sure if it will be a success it is still to be fitted. Once complete, Max then needs to manufacture a mounting arrangement that will allow it to be fitted to the AEC engine. We have brought up from the store, the spare engine and removed the generator so the bare bones are there to easily facilitate the construction of the new mounting plate. Once completed it will then be fitted to AEC 560. The new alternator presents two problems, the first was the charging gauge in the cab needs to be changed as the alternator can deliver 110 amps and the current gauge will only read up to 60 amps, but we are dealing with that in the new gauge change. Then the cables that were in use for the generator are hopelessly inadequate for the alternator, they are too small. We were rewiring the bus in any case, as sections of the lighting wire were found to have the insulation cracking and burnt together in places, so the alternator wiring along with every other piece of wiring will be replaced as we progress.

We are currently in discussions with the gauge manufacturer, after a couple of visits they have a firm idea of our requirements. It is a fundamental requirement of ours that these new gauges all need to look like they were placed there by the manufacture back in 1953. Please, before all the purists jump on me from a great height, we understand that this presents a little bit of heritage license. These new additional gauges will provide our driver with more informed information on the various systems of the bus. I am hoping that you all will trust us to make these improvements, while keeping the aesthetics of the vehicle correct. When these new gauges are at hand they will be shown first, before being fitted to the bus, to our patrons on our Patreon Channel. We are still progressing this matter and it will continue into the new year.

On the rear we have installed the rear panel work and the advertising and dress stripes, we had to replace two curved panels that hold the clearance lights as the originals were badly decayed and beyond repair. We also replaced one of the curved fibreglass panels on the near side as the original panel kept splitting as we recurved it back onto the bus, this was one of the panels we sourced from Gary Davey. We were about to install the top roof sheet but after removing it from its storage cradle, we discovered that there was an enormous amount of repairs that were required to be completed before it could be installed, these repairs took the best part of nine weeks, it is still sitting on the trestles awaiting lifting onto the roof. Logistically, it will require a few people to accomplish this task, as it is very flexible and needs the utmost control to ensure it is not damaged in the lifting process. Then we have to learn the solid rivet process to secure it. This will allow us to also reattach the side gutters. We have the rear near side window frame out at the sheetmetal firm currently as extensive repairs were necessary that were beyond our abilities, this should be returned early in the new year.

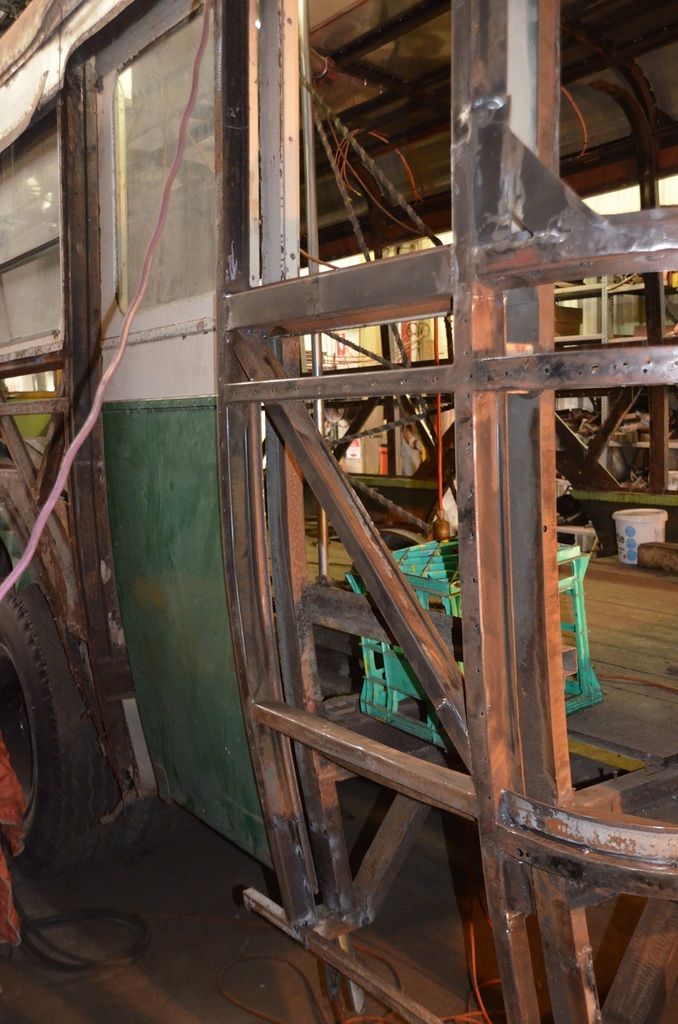
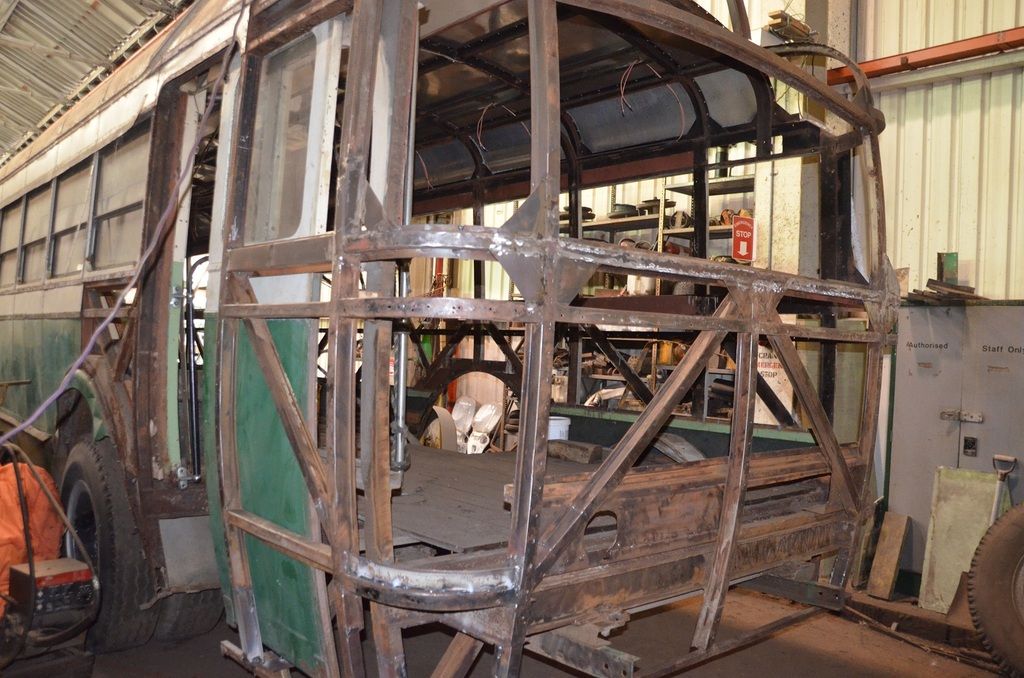
We have also removed the near side exterior panel work. To prevent us having another jigsaw puzzle we have gone and marked all the near side panels before removal. We discovered that part of the near side frame was about to fall out of the bus, the frame work had developed a fatigue crack which had completely broken through a section at the front saloon entrance door, it had completely separated the top section from the bottom section, it was possible to pull the two sections of the frame work apart by two inches (50 mm), very poor indeed. The tramways fix for this was a sheet metal patch over the external panelling where it had cracked. Recognised as a fatigue crack and not decay, it means the steel in that section of the bus is being continually exposed to stress cycles, this work hardens the steel causing it to fail. If we do not discover the reason for the stress cycles then we will need to seek some guidance of our Accredited Vicroads engineer to ensure we are proceeding correctly with these repairs. While we have deas on how we should proceed these need to be confirmed. To ensure we have addressed the stress concentration in that area.

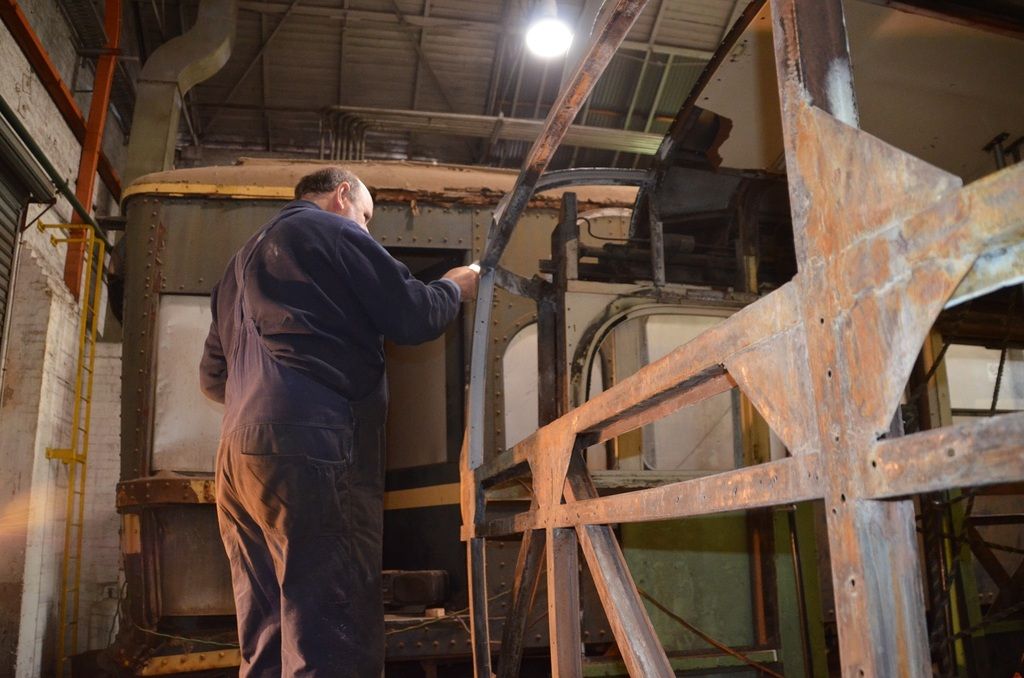
Brian our president, is in the bus restoration team he is responsible for the panel work, he has done marvellous work in the restoration of his little A30 Austin motor car. He has taken the near side panels and commenced panel beating these panels, removing all the dents, dings and blemishes. He then painted the rear of the panels to seal them and then sanded and painted the exterior section of all the panels. Some of the panels were beyond economic repair and in these instances new panels were manufactured with the old panel being used as a pattern. This takes an enormous amount of time but the repairs when painted look fantastic. So, the near side has thrown up more challenges. It is a saga, I can say!

In early 2019 the bus restoration team sat down and decided on the goals it wanted to achieve for 2019. These are listed below.

• Paint the off-side window sills and refit these.
• Repair the decay in the upper off side panel.
• Mask and Paint the entire off side of the bus lighter green.
• Reattach the rear panels and paint in the light green.
• Repair and replace the chassis strengthening members from the off and near sides, back into the chassis rails.
• Replace the chassis stretchers.
• Recondition the brake cylinders and replace these back onto chassis stretchers.
• Recondition the near side rear suspension unit replacing the existing spring with a spring in better condition.
• Number and remove the near side panels to expose the near side frame work.
• Repair the near side frame work and have it ready for sign off.

At the time, it was thought that these goals were considered ambitious and probably impossible, and while we fell short slightly, we achieved most of it. Which is a great effort really. As a restoration of this type occurs, it is often that we find a stack of sub tasks that need to occur to accomplish each of these original goals. Often these were not anticipated in the original goal setting but spring up as we proceed with the restoration, they need to be dealt with to achieve the ultimate goal and so they are additional work. To demonstrate that statement, let me explain! In late October after removing the exterior near side panels we asked Max if he could start the frame repairs to that side. After setting up he requested that all the interior panels be removed so he can use the grinder and welder without setting fire to everything. Immediately we understood the problem, the near side interior panelling was going to be used as a pattern to guide us in reassembling the off side interior panel work. The Bus restoration team went OH DEAR! Looks like we are on another tangent! We have to replace all the off side interior panel work, the strips were sorted and then the interior frame work needs to be painted with our rust preventative paint and all the strips installed, so they were back to cracking on so we could get Max to a point of being able to progress the near side frame repairs which are important. With that aside, on the whole it was felt when we set those goals if we achieved this, it would be considered great progress. We have done most of it, which is really encouraging.

Before I close, and I think I should, I would like to thank all those DERMPAV members that are active in the bus restoration. When its restoration is complete and it starts operations those that are working on the bus will be given the opportunity to operate it as the crew. We have decided that we will be suppling two members with it, every time it heads out of the depot, whether, it is going down the street to get fish and chips or heading out on a heritage tour. So that is two people, let’s call them a driver and a conductor, after all, one will drive, and the other will look after the passengers, although both will be qualified to drive and can switch around as they see fit. Currently, we have six members that are eager to convert over to operating crew so that will give us three crew. We think operationally we will need four crew, but as we progress you just never know who will walk through our doors wanting to get involved. It was interesting that late last year our second female member joined, after understanding our various restorations, she has become active in the restoration of the bus. She has indicated that she would like to drive it when it is completed, but getting into the driver’s cab was a challenge for her. It became apparent that an easier means of getting into the driver’s cab was required. From our stock of spare parts, we recovered from Bob Murphy’s place in Guilford, we sourced another foot step, it is exactly the same as the one currently fitted in the panel work. This was installed strategically into the frame work above the first one, in the void behind the front wheel, but just under the driver’s cab. We also sourced two of the cab side handrails, these are normally located internally on each side of the driver’s cab. The new ones sourced, had stainless steel grab tubes and the supports are brass, the supports will be painted the bus green and the stainless-steel tubes will remain polished. One was installed on the first pillar between the first and second saloon windows and the other will be above, but to the side of the driver’s cab, halfway between the gutter and the top of the saloon window, with these in place she was able to access the driver’s cab confidently. Success was ours! Sara has since spoken to our first female member and they have both decided to qualify as operating crew and run together, there is something to be said for girl power! These alterations to the original bus need to be thought out carefully to ensure the aesthetics of the bus are retained, if they do not blend in, they have no purpose to be there.

That is, and I hope it can be appreciated, a lot of progress for 2019 and AEC 560 draws closer to re-entering heritage operation. Towards the end of the year we had another vision from John, when again at lunch time, he declared that the light is now visible at the end of the tunnel, and on reflection he was right, we have now turned the corner and are heading toward the end. We anticipate that we are approaching the half way mark, at least that is how it feels.

If you are interested in financially supporting our organisations restoration of AEC 560 and receiving regular videos updates that show the details and progress of the restoration as it occurs. Please consider joining us on Patreon it is a small monthly contribution of approximately $5.50, it would make a fantastic gift for Christmas, the $5,50 equates to $66.00 over the year and will be the only Christmas gift you will enjoy over the entire coming year, every bit helps toward the restoration of AEC 560. Here is a link to our Patreon channel https://www.patreon.com/user?u=14209441 Use the link and visit our Patreon Channel and see if this suits you. Then click on the orange Become a Patron Button to join as patrons. You will then have about 50 videos to watch so you can catch up with our restoration.

If you would like to become involved with DERMPAV as an active member and be involved with the restoration of AEC 560 then please let us know you are interested, we can be contacted at info@dermpav.net.au we will then drop you a line letting you know our working days of DERMPAV so you can come along. Or you can just walk through our door, of course it needs to be open!

As always, my post would not be complete without rail motor photo, (we like rail motors!) so now this will appear at the end of the video.

Well that is it from me for now, I will see you next year in the next post, unless you become a DERMPAV patron through our Patreon channel or decide to become active with us restoring the bus. As always, feel free to comment if you want, we like to receive your comments and read what you are thinking, or what you think of our restoration project, you can ask questions, share your thoughts on our project, offer constructive ideas, or offer us festive season greetings. It really is up to you. We just like to hear from all of you, who sit each year and catch up with what is going on in the restoration of AEC 560. Our page views counter currently sits at 44,194, and climbing, that is a lot of people viewing our page, or maybe it is one person viewing it 44,194 times. As I have already said, feel free to leave a comment, but it is up to you!

My how time goes quickly, another year has passed since my last post! Christmas is a marvellous time. A time for family gatherings and catching up with good friends, then all too soon Christmas is over and we are celebrating and welcoming in the New Year, and then we are off again! It will be interesting to see what 2020 holds for the restoration of AEC 560, or maybe I should say what surprises AEC 560 holds for us in 2020.

Before I close up, I would once again like to apologise for the blurred photos and the Photobucket emblem that now appears over the photos posted in previous posts.

So on behalf of DERMPAV, I would like to thank you all for keeping abreast with the progress on AEC 560 and I would like to extend our sincerest best wishes for the coming festive season to yourself and your family. We hope you stay safe and we look forward to you joining us next year, either here or through our Patreon Channel where updates continue as AEC 560’s restoration progresses with its ultimate return to heritage service.

Please enjoy the video! See you all next year! It looks like you will need to click on the link below to see the video.

Regards
Colin Kelly
Secretary
DERMPAV

https://youtu.be/3CYwrYnyiXM
Last edited by AEC 531 on Fri Dec 06, 2019 6:17 pm, edited 1 time in total.
User avatar
AEC 531
Posts: 39
Joined: Sun Feb 26, 2012 5:25 am
Favourite Vehicle: AEC Regal mark III bus
Location: Newport

Re: AEC 531 A Regal Mark III bus

Post by AEC 531 »

Keats wrote:Just signed up to the Patreon account (chose $7.50 a month as the amount, rather than the default $4). Hopefully, a few more will do the same!
Many thanks for your continued support through our Patreon channel, this support is greatly appreciated. I am not sure what is going on, normally when people post a question I receive an email advising of such but in these instances I have received nothing, my apologies for not answering this earlier.
Regards
Colin Kelly
Secretary
DERMPAV
User avatar
AEC 531
Posts: 39
Joined: Sun Feb 26, 2012 5:25 am
Favourite Vehicle: AEC Regal mark III bus
Location: Newport

Re: AEC 531 A Regal Mark III bus

Post by AEC 531 »

system improver wrote:
Keats wrote:Just signed up to the Patreon account (chose $7.50 a month as the amount, rather than the default $4). Hopefully, a few more will do the same!
The videos are great - you can not only see the progress but, at least in my case, learn a bit about how buses are (or were) built.
Thank you system improver we are glad these videos are instructive, often we get it in our heads how we are going to do a thing, only to find we are on the wrong bus. then we consolidate our thoughts and finally head off in the right direction and on the right bus, it is like taking three steps forward and two back. Luckily now we have Elvis who understands these buses a lot better than we do, he guides us in many things.
Regards
Colin Kelly
Secretary
DERMPAV
User avatar
AEC 531
Posts: 39
Joined: Sun Feb 26, 2012 5:25 am
Favourite Vehicle: AEC Regal mark III bus
Location: Newport

Re: AEC 531 A Regal Mark III bus

Post by AEC 531 »

Hi All,

I see that the Christmas decorations are up in the streets of Ballarat, my home town. This signals the start of the festive season for me, in past years, as it will be this year, it is my prompt to post my reflection on the yearly progress we have made in the restoration of AEC 560. So, with that, we should probably move onto this year’s progress report on AEC 560.

Who would have known or been able to predict, the curve ball that the COVID 19 virus would throw us all in March of this year. It was a viral pandemic that caused the lock down of a nation, closed state boarders and established rules for the ability of us all to leave our homes. These new rules came into force through the Stay Home Directions issued under the Public Health and Wellbeing act of 2007. These actions were unprecedented in Victoria’s history. This virus was especially harmful to the elderly, and this caused some of our older members to self-isolate and continue our restoration works from their home base. I became the vehicle to collect and distribute the various items that each isolated member was working on, but fortunately due to the dedication of our membership, progress continued. To ensure that we were compliant with these new rules, those that remained at our depot at Newport decided to work in teams of two people. For this reason, we established sizeable projects of the restoration and each team focused on their own tasks. It was all coordinated so each of the teams could reach a point of completion to dovetail in with the other working teams even though we did not generally see each other. The various teams communicated with each other via SMS and lengthy emails, these started to include detailed photos when we were describing a thing, or the various teams required parts or equipment. Our weekly Patreon Channel Videos were also distributed to the members so everyone could see what all the members were achieving individually in isolation. It became a very useful communication tool and a weekly round up of events that each of us were working on, the various members found this very useful.

We were also mindful of the commitment we had made to our Patrons which we had established through our journey on our Patreon Channel. COVID caused us to rethink our options, generally, I would film all our progress on the Tuesday when all the members were present, but with quite a few of the members in isolation due to the COVID virus, all these members stepped up and started sending me short videos or photos or their individual progress, these would be included into the weekly video with a voice over for the audio to provide explanation of the item being viewed where a photo was used.

As you will be aware, from my previous posts, access to our Patreon Channel is a subscription-based service. It raises funds for our restoration projects. It charges our Patrons as a minimum, approximately $5.50 AUD per month, this equates to $66.00 over the year, although, we have been very fortunate as quite a few of our Patrons have elected to support us at a higher figure. In return for this financial contribution they have access to the plethora of videos that span the activities we carry out each week at the DERMPAV depot, they also receive a weekly update video every Monday of the previous week’s activities. Through this media they are able to follow along with the progress we make through our weekly video posts. I must admit that the videos for our Patreon Channel are very raw, they record our thought processes on how we are going to restore an item, they then follow along as we modify these thoughts as these are turned into actions as we discover the problems of achieving the restoration in practical terms. It is interesting that at the time of writing, since the commencement of 2020 we have posted 47 videos to our Patreon Channel, 2 of these are public videos. So if you have an interest in this post each year, I can only suggest to you that our Patreon Channel will provide a more in depth look at our endeavours over the year. Although the subscription needs to be paid each month, it would be a Christmas Present that will endure all the way through 2021.

You can become a Patron by clicking on the Link provided here, https://www.patreon.com/user?u=14209441 Then clicking on the orange, Become a Patron Button and following the prompts. Once you have completed this, you will need a thermos of tea and some food as you will have about 100 videos to watch to bring you up to date on the Restoration of AEC 560. It is appropriate here to acknowledge our Patrons. DERMPAV extends its sincerest thanks to those that have come on board early in the piece and have continued to provide the financial support that we receive through our Patreon Channel, this support is greatly appreciated. As I said last year, we hope the videos are both instructive and informative and keep them abreast of the happenings surrounding AEC 560 and its potential return to heritage service. For them this post will be superfluous, as the weekly videos take them more deeply into the restoration of AEC 560 than is represented here. This report only touches on the highlights of the 2020 year.
This year in spite of the COVID virus our progress has been staggering, it finally seems the light has appeared at the end of the tunnel. We can sense the end of this long journey is approaching. So, at the end of 2019 we had the rear hub off carrying out the various repairs necessary to put it back in good order, this has now been reassembled and the driveline crew have moved onto the front axle. Although we intended to replace the rear roof sheet, I did not think it was going to happen until the next year. Then on our Christmas break up day at Newport, the guys said why don’t we put the rear roof sheet up. Enthusiastically, all of us descended on the rear of the bus and in no time it was back up on the bus, held in place by two sash clamps. We knew it would be a cow to fit after it had been repaired and the frame work underneath it had also been repaired, it was also very flexible and being such a large item was very difficult to man handle back into position, but surprisingly after a lot of fiddling, the frame work and the rear roof sheet were a surprisingly close fit.

After replacing the rear roof sheet, we were sitting down enjoying our Christmas fare, talking about our progress when the discussion turned to how much progress we would like to achieve for the next year, 2020. After discussions it was decided that we wanted to get the bus completed externally up to the front of the near side, this involved the following works:-
• Fitting and securing the rear roof sheet.
• The rebuilding and refitting of the rear emergency access door.
• Rebuilding the rear and front saloon step wells paying attention to step illumination and removing any tripping hazards. The old step well assemblies were quite decayed.
• The overhaul of the near side and off side rear hubs.
• Painting of the rear diff assembly.
• The reinstallation of the fuel tank, with the installation of the sender for the drivers dash board fuel gauge and the installation of the fuel bug eliminator.
• The repair of the near side frame work with it passed and signed off by our Accredited Vic Roads Engineer.
• The return, and refitting of the overhauled war head.
• The near side frame work painted in our rust preventative paint.
• The near side panels replaced and secured.
• The window sills repaired.
• The window frames rechromed and new glass with anti-spoiling film installed on the internal sections of the saloon windows.

We all thought that this was very ambitious, probably not very achievable, but the bus restoration team wanted to set a goal that challenged us all to achieve some serious progress. Again, we all felt that if we achieved the majority of it, we would be very happy. Discussions ensured that we now have three teams of two people gathering each Tuesday, these three teams could all work independently carrying out various tasks, with some planning we thought that we might be able to achieve this outcome.

Throughout this restoration, we have discovered that nearly every item that we have removed has either been completely worn out requiring replacement or has been so severely decayed that these items require replacement. It has been a long struggle getting to our current level of progress, but along the way it has sometimes caused us to appear like we are not doing anything, while steady progress has been happening.

As I can now report we fell a little short of these lofty goals, but we achieved most of it. When we went to install the rear roof sheet, we found it was far too dangerous to work inside the bus with the rear section of floor missing. So replacing the removed section of floor became a major project, one that will now be completed in early 2021. The passenger entrance doorways caused us some concern as they required a complete rethink to better suit our needs in heritage service, these severely limited the progress down the near side. Although we did not reach the front of the bus as intended, we did manage to get to the rear of the front passenger entrance door. The exterior panels are now in the process of being installed. The rear diff assembly is now complete and the front axle assembly is disassembled, being in an advanced stage of restoration as I write this report, all the new bushings have been made, as the old ones were considerably worn, these are now in storage awaiting fitting. The brake warhead and the fuel tank were successfully installed, we had installed a sender unit into the fuel tank to accommodate a fuel level gauge to be mounted in the drivers cab.

The radiator debacle started out innocently enough with Brian asking for the front grille out of the radiator, so he could have it on hand to repair the damaged flutes. This lead to us removing the radiator assembly out of the bus to discover it is not fitted with a standard radiator, it is an aluminium assembly , once it was disassembled we were able to remove the grille panels and these are now over at Brian’s for remedial work but they are a now a low priority. But it has afforded us the opportunity to rebuild the radiator assembly, we will be adding four, 24 volt low profile thematic cooling fans, these will be mounted in a shroud that attaches to the radiator and ensures the cooling fans are drawing cool air through the radiator core. The existing arrangement lacks a shroud which renders the engine driven cooling fan ineffective. The largest advantage to the electric cooling fans is that while the bus is sitting idling when in heritage service, the cooling fans will still operate at their maximum efficiency and will keep the engine cool. There will be no more boiling radiator while negotiating a climb in the middle of summer. This will be the time the bus is used the most in our intended heritage service. Many items are in the process of being restored and refitted to AEC 560, this should ensure that 2021 will be an exciting year for us.

Although there is a huge amount of restoration work still to do to AEC 560, our organisation decided that once we turned the back corner of the bus, heading up the near side we would commence discussions with the authorities to enable us to be recognised as a bus operator allowing our organisation the ability to charge a passenger a fare. We need to be in this position, to cover the cost of the heritage tour and return the necessary profit as funding to our organisation to keep it financially buoyant to ensure its ongoing success, this allows us to carry on with future restorations. This task will ensure that all these regulatory requirements are sitting in place and we are not trying to established them when we are actually ready to change over from the restoration phase to the operations phase. Regulatory requirements, usually take an unusual amount of time to achieve. Our intended move from the restoration phase to the operations phase seeing AEC 560 move into heritage service, along with the recent changes to our Patreon journey will be a topic of its own Patreon video. These matters need to become a little more advanced before I am able to sit down and confidently explain them to our Patrons. To be honest, I am not sure how many of our Patrons will enjoy it, as it will just be me in front of the camera, talking candidly about the issues and the solutions we have put in place to satisfy these requirements. As our Patreon videos do, it will provide an in depth explanation why these measures are necessary. As always, we welcome feedback from our Patrons over that forum and always respond to all their queries, as we do on this forum.

Before I close, and I think I should, I would like to thank all those DERMPAV members that are active in the bus restoration and have adapted brilliantly to the COVID virus. When its restoration is complete and it starts operations those that are working on the bus will be given the opportunity to operate it as the crew. Currently, we have eight members that are eager to convert over to operating crew so that will give us four crews. As AEC 560 will operate with a driver and a conductor at all times. I would also like to thank all our Patrons who over this year have continually tuned in to watch the weekly update videos and along the way have contributed financially to our organisation. Finally, I would also like to extend my thanks to all of you people that come back each year and tune in to see what is happening with AEC 560. Our page view counter on this forum currently sits at 59,305 which is an increase of nearly 15,000 views over last year’s figures, that figure is still climbing, that is a lot of people viewing our page.

That is, and I hope it can be appreciated, a lot of progress for 2020 and AEC 560 draws closer to re-entering heritage operation. It really feels like the end is near and that is a great thing! To see AEC 560 negotiating the streets of Melbourne again rejuvenated and carrying passengers will be marvelous.

If you are interested in financially supporting our organisations restoration of AEC 560 and receiving regular weekly video updates that show the details and progress of the restoration as it occurs. Please consider joining us on Patreon it is a small monthly contribution of approximately $5.50 AUD, or 3.30 GBP if you are in England or $4.00 USD if you are in America, whichever is the case, it would make a fantastic gift for Christmas. It will be the only Christmas gift you will enjoy over the entire coming year, every bit helps toward the restoration of AEC 560. Here again is a link to our Patreon channel https://www.patreon.com/user?u=14209441 Use the link and visit our Patreon Channel and see if this suits you. Then click on the orange Become a Patron Button to join as patrons. You will then have quite a few videos to watch so you can catch up with our restoration journey.
If you would like to become involved with DERMPAV as an active member and be involved with the restoration of AEC 560 then please let us know you are interested, we can be contacted at info@dermpav.net.au we will then drop you a line letting you know our working days of DERMPAV so you can come along.

As always, my post would not be complete without rail motor photo, (we like rail motors!) due to the problems with the photo bucket system that we used previously that photo will appear at the end of the video.

Well that is it from me for now, I will see you next year in the next post, unless you become a DERMPAV patron through our Patreon channel or decide to become active with us restoring the bus. As always, feel free to comment if you want, we like to receive your comments and read what you are thinking, or what you think of our restoration project, you can ask questions, share your thoughts on our project, offer constructive ideas, or offer us festive season greetings. It really is up to you. We just like to hear from all of you, those that sit each year and catch up with what is going on in the restoration of AEC 560. As I have already said, feel free to leave a comment, but it is up to you!

My how time goes quickly, another year has passed since my last post! Christmas is a marvelous time. A time for family gatherings and catching up with good friends, then all too soon Christmas is over and we are celebrating and welcoming in the New Year, and then we are off again! It will be interesting to see what 2021 holds for the restoration of AEC 560, or maybe I should say what surprises AEC 560 holds for us in 2021, but there cannot be to many now!

So on behalf of DERMPAV, I would like to thank you all for keeping abreast with the progress on AEC 560 and I would like to extend our sincerest best wishes for the coming festive season to yourself and your family. We hope you stay safe and we look forward to you joining us next year, either here or through our Patreon Channel where weekly updates continue as AEC 560’s restoration progresses with its ultimate return to heritage service.
Here is the link to the slideshow of our photos that accompany this report, https://youtu.be/zXiuCkIVuS4 please enjoy the video of the photos and the explanations! See you all next year!

Regards
Colin Kelly
Secretary
DERMPAV
4.12.2020
User avatar
The Cap a tan
Posts: 490
Joined: Sat Oct 01, 2005 10:25 pm
Location: Mooroolbark

Re: AEC 531 A Regal Mark III bus

Post by The Cap a tan »

Thanks for the update Colin, enjoyed your youtube link with the photos also.

Merry Christmas and Happy New Year.
User avatar
AEC 531
Posts: 39
Joined: Sun Feb 26, 2012 5:25 am
Favourite Vehicle: AEC Regal mark III bus
Location: Newport

Re: AEC 531 A Regal Mark III bus

Post by AEC 531 »

Hi All,

Once again, I see that the Christmas decorations are up in the streets of Ballarat, my home town. For me this signals the start of the festive season, as in previous years it prompts me to start writing DERMPAV’s reflection on the yearly progress we have made in the restoration of AEC 560. I try and publish this reflection in the first week of December. It seems I have failed this year!

Before we jump into the report on AEC 560, I would first like to address the coming Steamrail Open Days. Then I would like to encourage you to join up with us, showing your support for our efforts in restoring AEC 560 in a practical way through our Patreon Channel. First lets talk about the Steamrail Open Day. In November our focus shifted to organising ourselves for the coming 2022 Steamrail Open Days. While they are only held over three days, there is an enormous amount of planning behind the scenes that is needed to ensure the event runs smoothly for our organisation. These will be held on the 12th, 13th, and 14th March 2022, (the March Long weekend). Steamrail now have ticket sales available, use the link here to secure your tickets and come and see us at DERMPAV. Here is a link to the Steamrail website. https://www.steamrail.com.au/opendays AEC 560 occupies a section of our shed that is not normally open to the general public. At previous open days we have been requested by various bus enthusiasts to have the privilege of us escorting them down so they can inspect AEC 560, we have normally accommodated these requests. At the 2022 open days, that will not be possible. Since the last Open day our restoration team have had a major effort toward completing AEC 560. Our progress has been outstanding, although we failed to achieve our ultimate goal of having it back in heritage service, we have progressed its restoration a lot further than we would have without this deadline in place. During the coming Open Days, our executive committee has made the decision to only provide access to AEC 560 to our Patrons, these are the people that have been following along providing general financial support to the restoration. I extend my apologies to anyone that is offended by this condition. Currently AEC 560 is supported by blocks of wood while not being unstable it is not on its road wheels. Most of our members will be very busy operating our endeavors to ensure we receive the very best cash injection we can achieve to keep our organisation financially buoyant, funding AEC 560’s restoration, keeping it on track. I extend my thanks to you all for your understanding in this matter, and hope this situation causes no offence.

Now a word from our sponsor! We are not able to progress our restorations without a solid funds base, in part this is achieved through the monthly subscriptions from our Patrons through our Patreon channel. We would ask you to kindly consider joining us there, show a demonstration of your continued support for the restoration of AEC 560. Make difference! Join us now!

Our Patreon Channel is a subscription-based service. We use its funds for the restoration of AEC 560. A patron in return for their financial contribution of $5:50 AUD per month receives access to all the videos we have made showcasing AEC 560’s restoration, but it also focuses on other various projects we work on at the depot each week. Every Monday we post a weekly update video of the progress we have made over the previous week. The subscription varies depending which country you are in. For example, a patron in America will be charged $4.00 per month, in Australia this equates to $5.50 per month, in Great Britain it is approximately 3 pounds. Anywhere in Europe it works out to be 3.3 Euro.

This financial contribution equates to $66.00 AUD per year, it would make a great Christmas present to a person that holds an interest in watching our activities over the year. It will keep you up to date on AEC 560’restoration progress and will make this post superfluous. While it is encouraged by the Patreon organisation to acknowledge our Patrons by naming them and thanking them for their continued financial support, DERMPAV has made a decision not to adopt this measure but rather we thank all our Patrons for their support as a collective. We are also very fortunate that some of our Patrons have elected to support us at a higher level than the $5.50 AUD that is set as a minimum, to those people we are most grateful. We also have Patrons that prefer not to support us over Patreon but wish to send us their financial support in the form of a money transfer or a cheque. These people receive the link to our videos via email, to them we are also most grateful for their continued financial support and their faith that DERMPAV has the competencies and capacity to pull off a restoration as large as a Regal Mark III bus, with the confidence that we will return it to heritage service. I would like to say here that regardless of the level of financial contribution we are most grateful and very appreciative of the continued interest and financial support offered to our organisation, every offering of support helps enormously.

You can become a Patron by clicking on the Link provided here, https://www.patreon.com/user?u=14209441

Then click on the orange, Become a Patron Button and follow the prompts. Once you have completed this, you will have about 200 videos to watch to bring you up to date on the Restoration of AEC 560. (After all, we have been making them since October 2018) Then every Monday you can look forward to our next update video. For our Patrons, this post here in the Bus Australia Forum will be superfluous, as the weekly videos take them more deeply and in more detail into the restoration of AEC 560 and the processes we employ to achieve our outcomes than is represented here. This report only touches on the highlights of the 2021 year.

We would like to thank our sponsor for that message, but now it is time to dive into this year’s progress report on AEC 560.

As we did last year to maximise progress, we have decided to do it again. Our normal Christmas break will be shortened. We will finish at Newport on the 21st December 2021 and will resume on the 4th January 2022. Our regular Patreon video updates will resume at that time also.

The COVID pandemic continued to provide us with strategic challenges throughout 2021. We have remained separated throughout the year, with our separate teams of two people working in the depot at different times to maintain our isolation and reduce the potential for cross contamination of this virus.

At the end of last year we had established some very robust goals as the restoration team believed that while it might be a case of biting off to much to chew, the deadline will ensure, we achieve more progress than the year past. Largely that has been the case! Our progress has been enormous, but still there is a long way to go!

We entered 2021 in a good position, and over this year we have achieved an enormous amount. Sara decided that she wanted to sand the bus exterior back to bare metal as it would give the best finish for the new paint that was going to be applied. She has worked diligently over the year and completely rubbed back the off side and the rear of the bus. She also took the opportunity to rub back all the near side panels while they were off the bus. As this occurred, Vince applied the primer coat to the exterior panel work. It was fantastic watching the off side transform from a patchwork quilt appearance to a solid colour, even if it was just the primer coat. All the members commented how good it looked in one solid colour.

With the repairs to the Chassis and its associated strengthening members behind us, the replacement of the rear section of the saloon floor came sharply into focus and everyone started working toward that objective. This entailed fitting the rear mud guards, and splashers together, then fitting them into the bus, we achieved this installing the wheel guard seals into the car body as we went. We changed over to a rubber seal rather than the previous canvas one, as it provided a better and more flexible seal. Once the splashers and mudguards were finally fitted back into the bus permanently, we started to fit the rear saloon floor boards back into position. These had been removed to allow us access to carry out the repairs to the chassis strengthening members. We needed floor boards that were 5 metres long, being 19 mm thick, this caused some problems until we contacted a contractor that was removing the old wooden floor out of the Monbulk Primary school, its hallways provided the necessary boards. In planning to fit these we realised that we needed to install the rear interior panels to allow us to have a reference to create a template to cut the floor boards to. The metal rear interior panels were subsequently stripped of paint by Sara, prepared and painted by our team and then fitted back into the bus. Bloody Hell did they look impressive!

We have decided treat the bus as a time capsule so the interior of the bus will be retained in its 1978 appearance when it was withdrawn, whilst the exterior will appear in its 1953 livery as it was delivered. This decision has assisted us greatly in the colour selection of the panels. All the new paint has been colour matched. We have also established our Heritage poster series which have been sized to fit the wooden rails on the interior of the bus, these showcase advertising material from the period, along with world events that occurred during the buses service life. We have also included concert posters of well-known performers where they played in Melbourne during that period. We have even secured a poster by AEC that was used to promote the Regal Mark III bus chassis it is dated 1949, we could not resist so we have included it, as it is for our bus, how quaint! All of these posters have been shown to our Patrons during the respective video updates they receive each Monday. This bus is going to look stunning and represent a rich slice of Melbourne and its transport history when it is finished, that objective is not far away.

The front radiator assembly turned into a saga, it was something that we felt would have been a quick and easy job, but it turned sour. The radiator was removed from AEC 560 for overhaul, during this process it was dismantled and the various sections of it restored, it was ready to reassemble. We only needed the aluminium surround highly polished then we could reassemble it. However, it failed to exhibit the shine expected from a highly polished surface. It presented with a dull haze, like a fog had settled over the part. After loads of research, (YouTube) we decided to have a member sit with our polishing equipment and using just a polishing paste that is designed to polish aluminium, bring the surround of the radiator to a higher polish. He came and hand polished a bit of it and achieved promising results, he requested us to acquire some microfibre polishing cloths to go onto our orbital sander to allow much better results. The radiator core has been cleaned of all its internal debris and all the other fittings have been out to the chrome shop and have been re-chromed and look absolutely fantastic. Being mindful of the stories that abound of these buses boiling over, having to stop with steam pouring out of the radiator cap. We decided to make a few alterations to either prevent or marginally reduce these incidents. We first created a shroud for the fan to operate within, this ensures all the air is drawn through the radiator core for cooling purposes, then secondly, we converted it over from an engine driven fan to electric operation. We spoke to the Davies Craig rep and told him what we were doing, he recommended two 12 inch 24 volt cooling fans, for assurance and reliability we fitted four, these work in groups of two and will be more than adequate to hopefully ensure we do not have to stop due to the engine coolant reaching unacceptable limits. Once the radiator shroud is repolished to acceptable limits it will be reassembled and stored in its holding frame at Newport awaiting refitting to AEC 560.

Elvis and Peter had concentrated their efforts on the mechanical parts of the bus, the work they have completed is truly a credit to them, they have done absolutely amazing work. They started at the rear axle assembly then moved to the front axle assembly then started down the two drive shafts arriving at the Diesel engine. They have dismantled the front and rear axle assemblies, rebuilding each completely replacing all the worn bushes, a lot of these, although still operating, were completely flogged out. It was absolutely amazing following their journey in the weekly videos published each Monday as they discovered just how badly worn all the various bushings were. They also discovered the extreme wear in all the wheel bearings, the brake return springs had lost their tension, but the most telling were the brake piston seals, the new ones were a stark difference holding air pressure so much better than the old seals. We suspect the braking effort of 560 will be markedly improved as the pistons will not bypass air pressure to create the necessary seal to start working. We watched on week after week as Peter on our lathe manufactured new bronze bushings for the S cams, king pins and hub bushings, for a while it looked like it would never end. Elvis and Peter have done a fantastic job of the bus mechanicals and the reliability of it will be a credit to their work.

After completing the overhaul on the front axle assembly, they moved up the driveline, they discovered that the universals were absolutely on their last legs with the hardness having been removed off the universal journal on the drive side, we reached a decision to replace all five universals on the drive shafts and each of the old ones revealed their secrets as they were removed, but none could have been reused. If these had been left in position, they would have failed in heritage service in a short time, not a desirable situation. As we enter 2022, Peter and Elvis will continue on with the work on the Diesel engine, as always this work will feature in our weekly update videos each Monday.

It is paramount that AEC 560 is as reliable as it can be, in order that it will provide continued heritage operations on DERMPAV heritage tours. From a business perspective we cannot afford 560 to be broken down on the side of the road. Although there is a huge amount of restoration work still to do to AEC 560, our determination to attempt to meet our deadline ensured a lot of restoration progress occurred, throughout this year.

Before I close, and I think I should. I would like to thank all those DERMPAV members that are active in the bus restoration and have adapted brilliantly to the COVID virus. I would also like to thank all our Patrons who over this year have continually tuned in each week to watch the weekly update videos and along the way have contributed financially to our organisation, this support is greatly appreciated. Finally, I would also like to extend my thanks to all of you people that come back each year and tune in to see what is happening with AEC 560. If you haven’t yet, I will again ask you to join us through our Patreon Channel. Our Bus Australia Forum view counter for this post currently sits at 69,203 which is an increase of nearly 10,000 views over last year’s figures, that figure is still climbing, that is a lot of awesome people viewing our post.

Well, that is all I have for this year! If you would like to stay up to date with our progress, I would suggest you join us on Patreon, through a monthly subscription of $5.50 AUD. This would make a fantastic gift for Christmas. It will be the only Christmas gift you will enjoy over the entire coming year! Every bit helps toward the restoration of AEC 560. Here again is a link to our Patreon channel, https://www.patreon.com/user?u=14209441 Use the link and visit our Patreon Channel and see if this suits you. Then click on the orange Become a Patron Button to join as patrons. You will then have quite a few videos to watch so you can catch up with our restoration journey.

I hope everyone can see that we have achieve substantial progress for 2021. AEC 560 draws closer to re-entering heritage operation. The end really is in sight now, that is a great feeling spurring on the restoration team. To see AEC 560 negotiating the streets of Melbourne again on our DERMPAV heritage tours will be fantastic.

It always amazes me just how quick time slips by; we have completed another year since my last post! The atmosphere of Christmas is marvelous. It is a time for family gatherings and catching up with good friends, then all too soon Christmas is over and we are celebrating and welcoming in the New Year, then we are off again! It will be interesting to see what 2022 holds for the restoration of AEC 560, as we no longer believe 560 has any more surprises for us.

As always, my post would not be complete without rail motor photo, (we like rail motors!) this will appear at the end of the video.

So on behalf of DERMPAV, I would like to extend our sincerest best wishes for the coming festive season to yourself and your family. We hope you stay safe and we look forward to you joining us next year, either here or through our Patreon Channel where updates continue as AEC 560’s restoration progresses with its ultimate return to heritage service.

Here is the link, no, not to our Patreon Channel! but to the slideshow of our photos that accompany this report, https://youtu.be/xVmzOSg4hIo please enjoy the video of the photos and the explanations! See you all next year!

Regards
Colin Kelly
Secretary
DERMPAV
18.12.2021
User avatar
Guy_Arab
Posts: 854
Joined: Sat Mar 06, 2004 10:11 pm
Favourite Vehicle: M.A.N Bus & Guy Arab
Location: Perth W.A.

Re: AEC 531 A Regal Mark III bus

Post by Guy_Arab »

DO YOU REQUIRE A MANUAL? PLUS ELECTRICAL DATA
GUY ARAB
User avatar
AEC 531
Posts: 39
Joined: Sun Feb 26, 2012 5:25 am
Favourite Vehicle: AEC Regal mark III bus
Location: Newport

Re: AEC 531 A Regal Mark III bus

Post by AEC 531 »

Hi Guy,

No thankyou, we have acquired (from Ebay) the correct manual for our bus. Previously we were referring to the incorrect one which we had purchased from someone in Western Australia. (cannot remember who now, we made the purchase when we started 560's restoration) while it was close, as Elvis and Peter discovered when they were restoring the front axle assembly the differences were misleading, fortunately this pick up lead us to acquire the correct manual. We are in the process of digitising it, so we do not have to keep handling the actual manual as we establish the correct specifications and work methods to put 560 back in roadworthy order.

Many thanks for the offer through.

Regards
Colin Kelly
Secretary
DERMPAV
proftca
Posts: 8
Joined: Tue Dec 14, 2021 8:45 pm

Re: AEC 531 A Regal Mark III bus

Post by proftca »

Administrators, or any Moderators please delete
Last edited by proftca on Mon Jan 17, 2022 8:58 pm, edited 2 times in total.
User avatar
AEC 531
Posts: 39
Joined: Sun Feb 26, 2012 5:25 am
Favourite Vehicle: AEC Regal mark III bus
Location: Newport

Re: AEC 531 A Regal Mark III bus

Post by AEC 531 »

Hi,

Unfortunately I am at a loss where you might get a spare set of headlights for an AEC Regal Mark III, the spares we have are very badly damaged and were canablised to get the units on 560 back into good order. Both the headlight shroud and their body were seriously deformed probably during storage. Maybe someone else on this forum might be able to suggest where a set could be sourced.

Regards
Colin Kelly
Secretary
DERMPAV
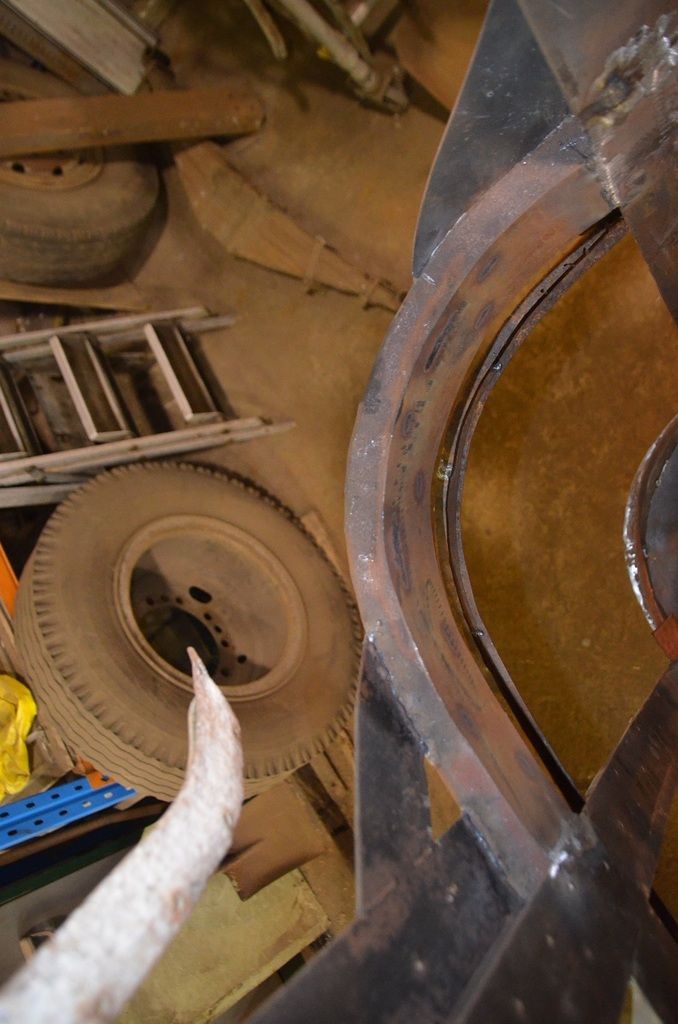
User avatar
boronia
Posts: 21577
Joined: Sat Mar 06, 2004 6:18 am
Favourite Vehicle: Ahrens Fox; GMC PD4107
Location: Sydney NSW

Re: AEC 531 A Regal Mark III bus

Post by boronia »

It would be very hard to find any locally. An occasional bus wreck shows up with them still on, but probably very poor condition.

You could try some of historic commercial sites on Facebook or www, maybe in England.
Preserving fire service history
@ The Museum of Fire.
User avatar
boronia
Posts: 21577
Joined: Sat Mar 06, 2004 6:18 am
Favourite Vehicle: Ahrens Fox; GMC PD4107
Location: Sydney NSW

Re: AEC 531 A Regal Mark III bus

Post by boronia »

Casula Wreckers are long gone from there unfortunately. Most of their buses were ex DGT, which didn't have those lights anyway.
Preserving fire service history
@ The Museum of Fire.
proftca
Posts: 8
Joined: Tue Dec 14, 2021 8:45 pm

Re: AEC 531 A Regal Mark III bus

Post by proftca »

Administrators, or any Moderators please delete
Last edited by proftca on Mon Jan 17, 2022 8:58 pm, edited 1 time in total.
Post Reply

Return to “Discussion - Melbourne / VIC”